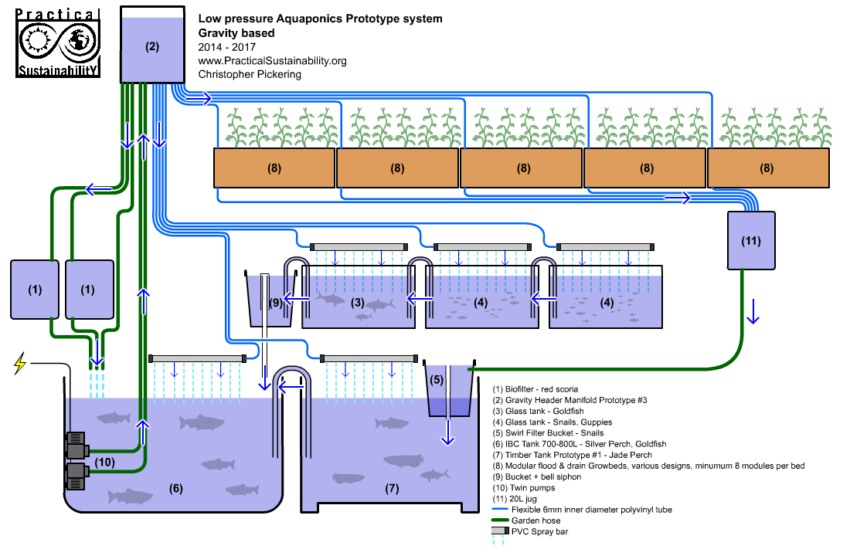
This is the full overview of the Gravity-driven Aquaponic unit prototyping system that ran from 2014-2017 in Sydney, Australia. The system was designed to have zero high pressure plumbing joints or complex fittings, and only use very low flow rate feeds to multiple grow bed prototypes for testing. Every part of the system was modular, down to the individual plants.

Index:
(1) 20L Biofilter – Red Scoria
(2) Gravity Header Manifold
(3)(4)(4) Glass Aquariums
(5) Simple Swirl Filter
(6) Main IBC Tank
(7) Timber Tank Prototype #1
(8)(8)(8)(8)(8) Modular Growbeds
(9) Simple bucket with bell siphon
(10) Twin Pumps
(11) Reservoir
Summary
(1) 20L Biofilter – Red Scoria
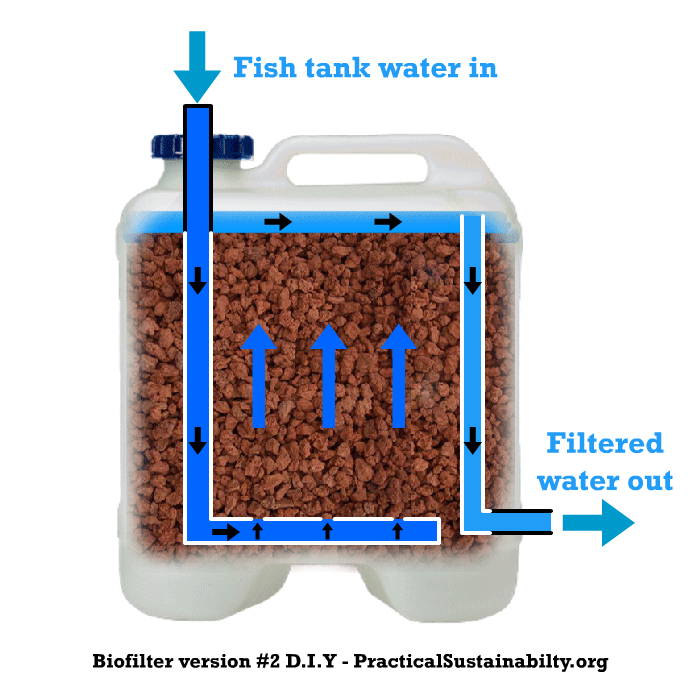
Simple recycled jugs filled with red scoria. Biofilters were powered by the lowest priority, largest diameter outflows from the Gravity Header (2).
These units functioned near perfectly for years with no problems. The only maintenance ever undertaken was a swift smack with the palm of a hand if they had a reduced flow rate. This happened once a year at most.
Full article here: https://www.practicalsustainability.org/2016/11/16/simple-aquaponic-biofilter-prototype-1-2/
(2) Gravity Header Manifold
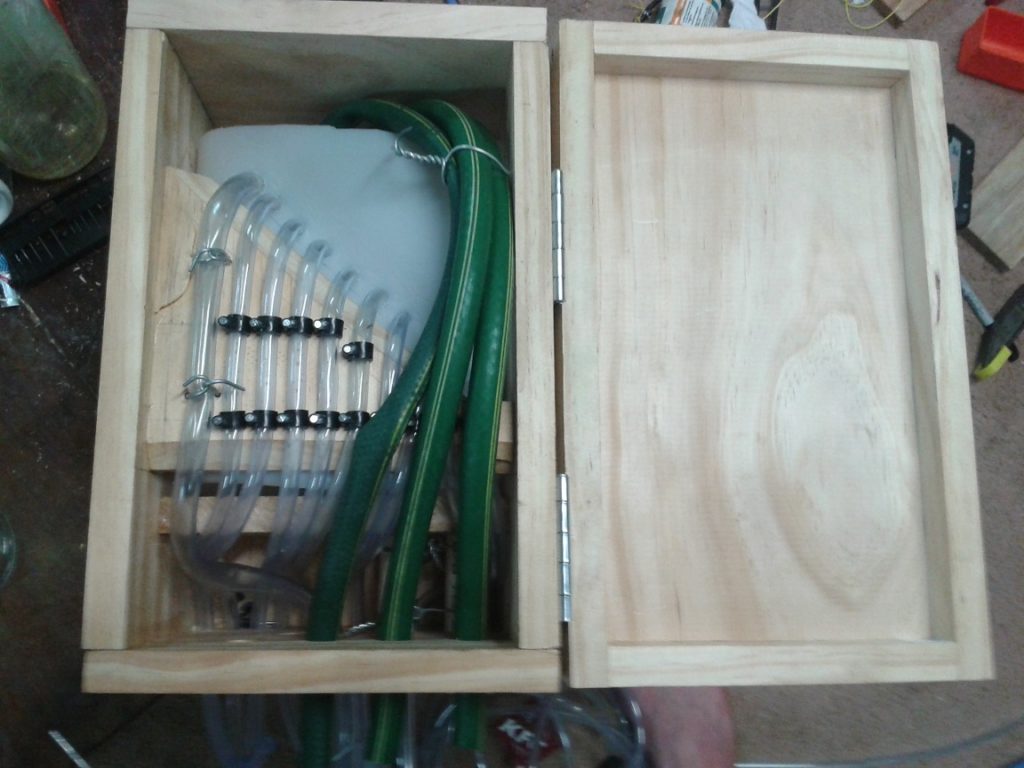
Simple 5L jug, plumbed with small diameter pipes. The height of where each pipe is plumbed in to the main reservoir sets it’s priority in case of flow reduction from the pumps for whatever reason. Flow Priorities were as follows:
- Spraybar Rightmost Tank (4)
- Spraybar Tank (7)
- Spraybar Tank (6)
- Spraybar Leftmost Tank (4)
- Growbed
- Growbed
- Growbed
- Growbed
- Growbed
- Spraybar Tank (3)
- High Diameter drain to Biofilter (1)
- High Diameter drain to Biofilter (1)
- Unobstructed main overflow to tank (6)
Full article and DIY tutorial here: https://www.practicalsustainability.org/2018/11/01/gravity-header-manifold-prototype-3-tutorial/
(3),(4),(4) Glass Aquariums
All three tanks were connected in series via lengths of garden hose running permanent siphons, and each tank was fed via it’s own independent PVC spray bar from the Header (2). A flood and drain cycle was introduced by a Bell Siphon in the bucket (9), which was also connected via a garden hose siphon. Water level change during flood/drain was around 10cm(4 Inches).
When the system started, the tanks were not insulated, and did not have proper lids. During a particularly bad cold spell the temperature dropped to 8c (46.4f) overnight, and over 30 guppies died out of around 100. After that, a thin layer of yoga mat on the back and sides, plus legit wooden lids were added to all tanks. No further deaths occurred from wild temperature changes.
Aquarium (3) Contained 8 Goldfish and one Yabby. The goldfish grew quite large over time and eventually some were moved to tank (6) where they co-existed fine with 20 Silver Perch of a similar size. After growing quite large, the Yabby escaped and was never seen again.
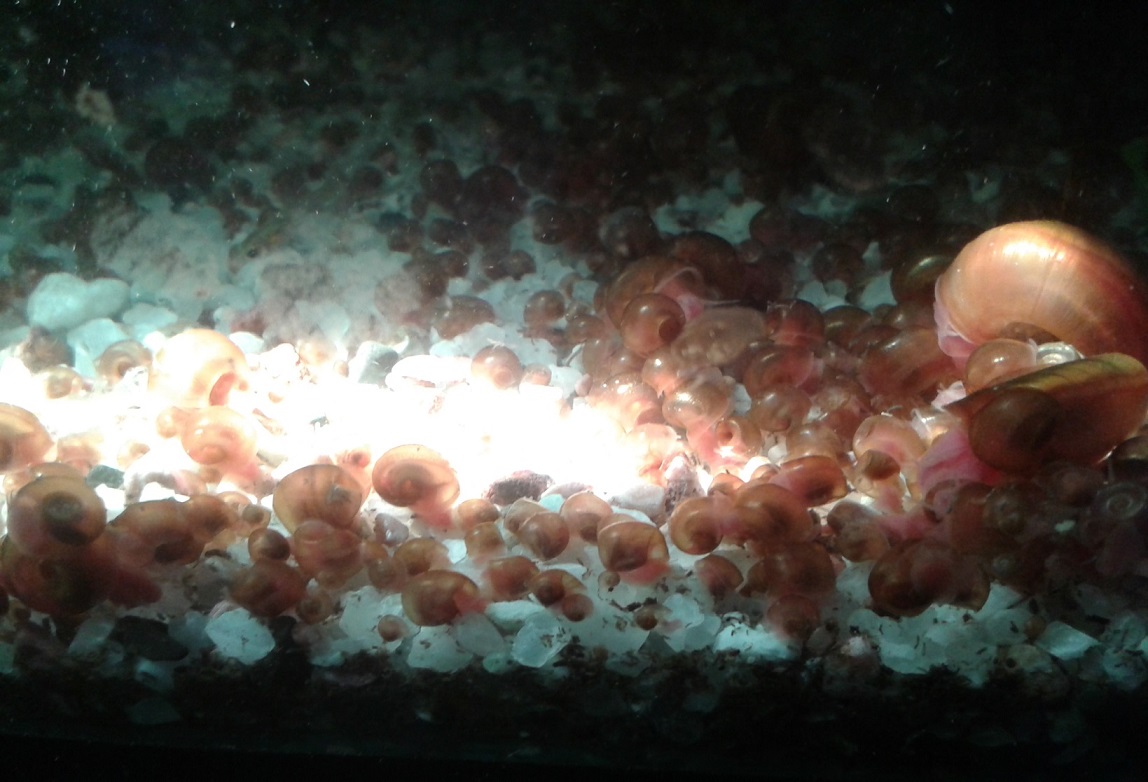
Aquariums (4), (4) Contained guppies and generic aquarium snails. Snail populations followed a boom and bust pattern – during a boom, snails were fed by the handful to the Silver & Jade Perch in the main tanks.
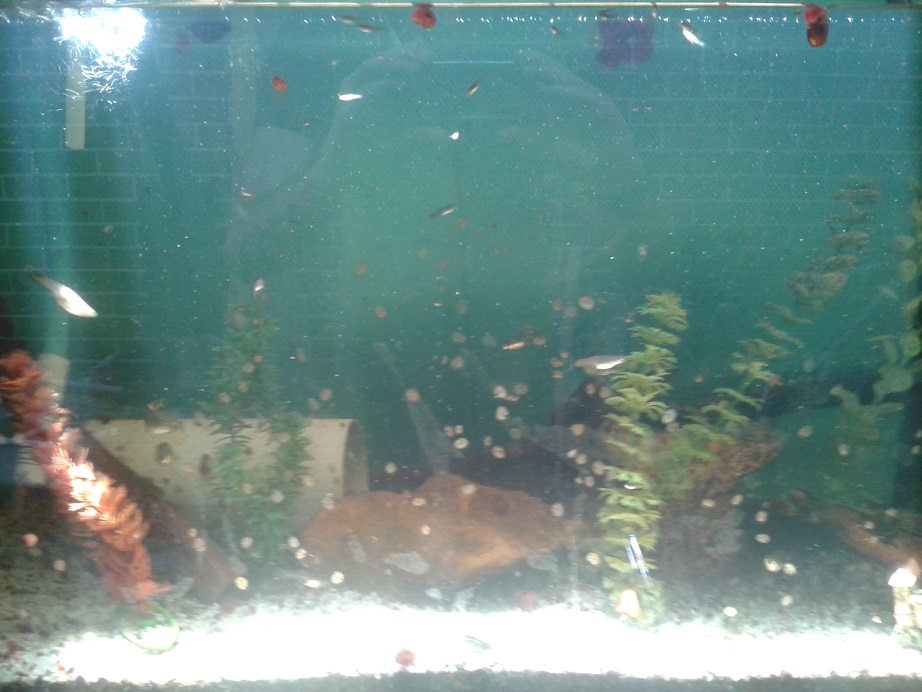
The guppies were originally meant to be feeder fish for the Perch, but they proved so effective at consuming waste biological matter that this didn’t happen often. A population of 8 guppies grew to hundreds over two years, as they give live birth instead of laying eggs. After cleaning any components I would dump the waste such as slime from the swirl filters, sediment, or decaying root matter from old plants – the guppies would finish it off in no time.
(5) Simple Swirl Filter

This filter doesn’t need much explanation. It was fed from the combined outflows of all the growbeds, and had a small population of snails to keep it under control. Occasionally excess waste was siphoned out, and fed into the large snail/guppy tanks (4)(4).
Full Bucket Swirl Filter article and DIY tutorial is here: https://www.practicalsustainability.org/2016/11/20/diy-swirl-filter-1/
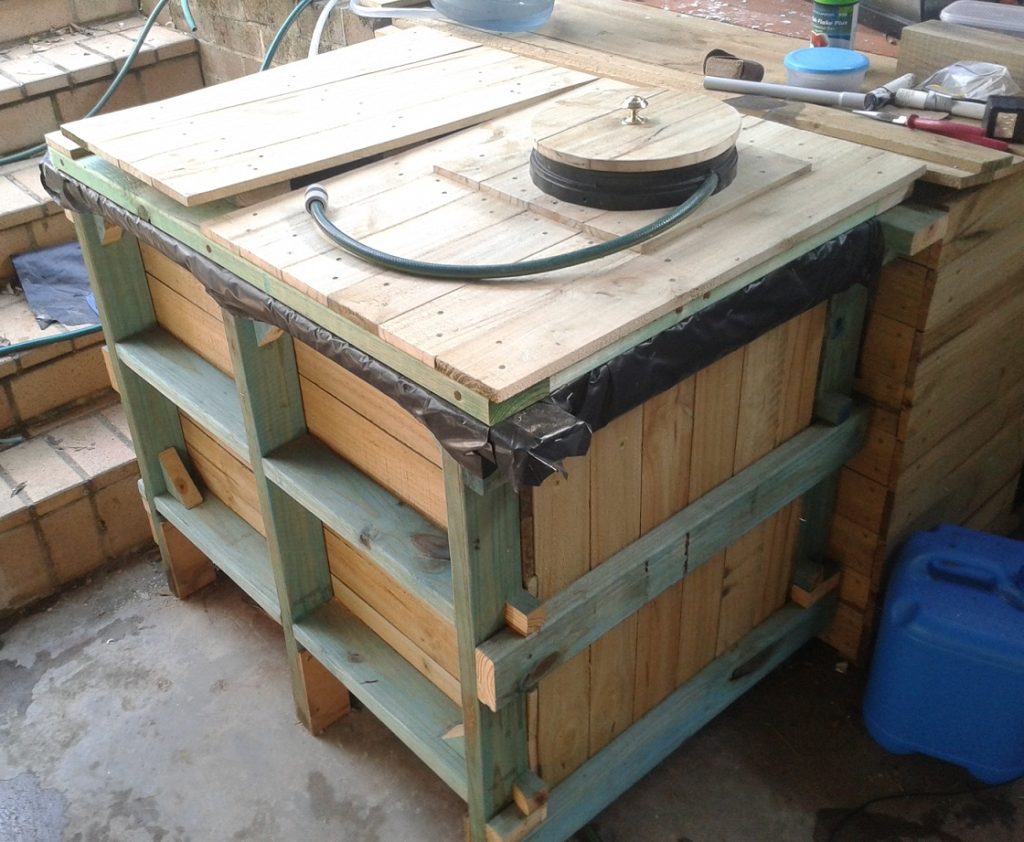
(6) Main IBC Tank
A basic IBC with the top cut off, clad and lidded with pine fence palings. This was technically the sump of the system – from which all water left and returned to. Nothing fancy – basic holes drilled in the lid to allow all plumbing shown in the diagram to pass through the lid. Contained 20 Silver Perch, 10 Goldfish and two Yabbies, and some other stuff later in the life of the system.
There was nothing particularly remarkable about the main tank, which ran at around 700L – 800L and operated as the lowest point in the system. Vacuuming the gravel with an Aquarium cleaning siphon was necessary once a year, the waste from which was then fed to the snails/guppies.
Two Yabbies were present in the tank, and lived in peace once they were given enough places to lurk. But eventually, one grew large enough to escape, and the other was eaten by Perch once they grew large enough.
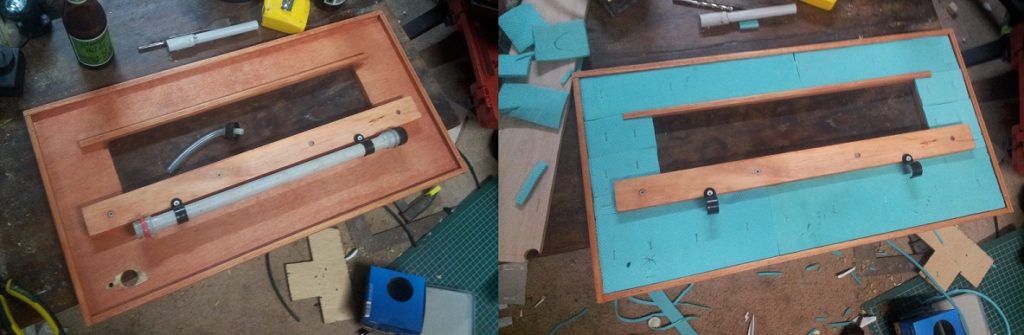
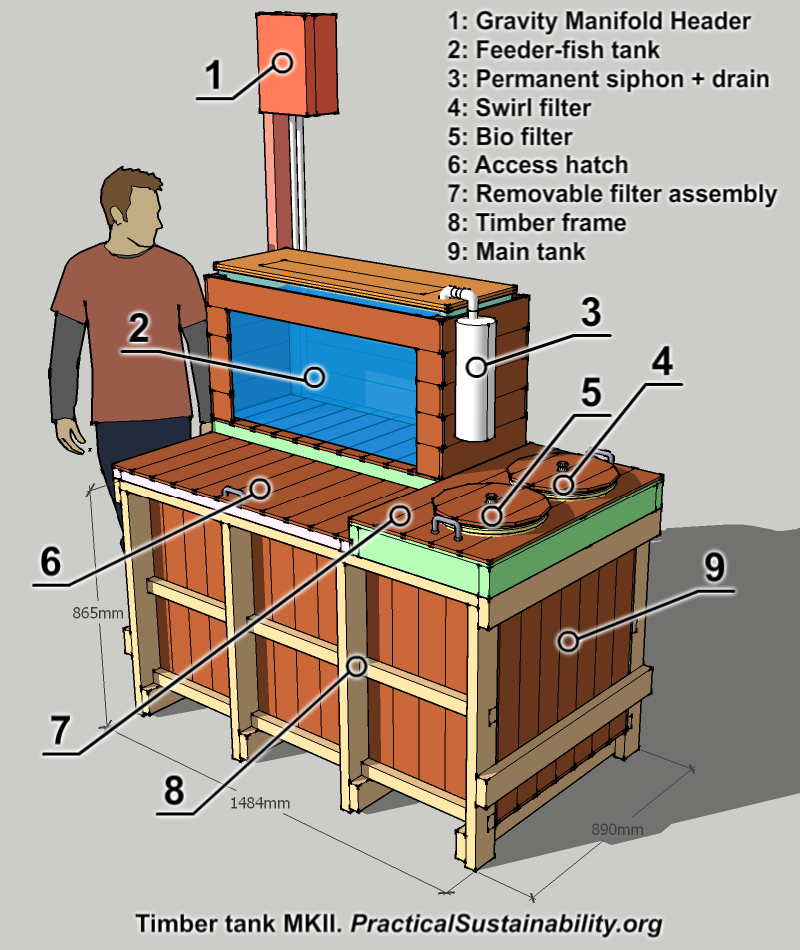
(7) Timber Tank Prototype #1
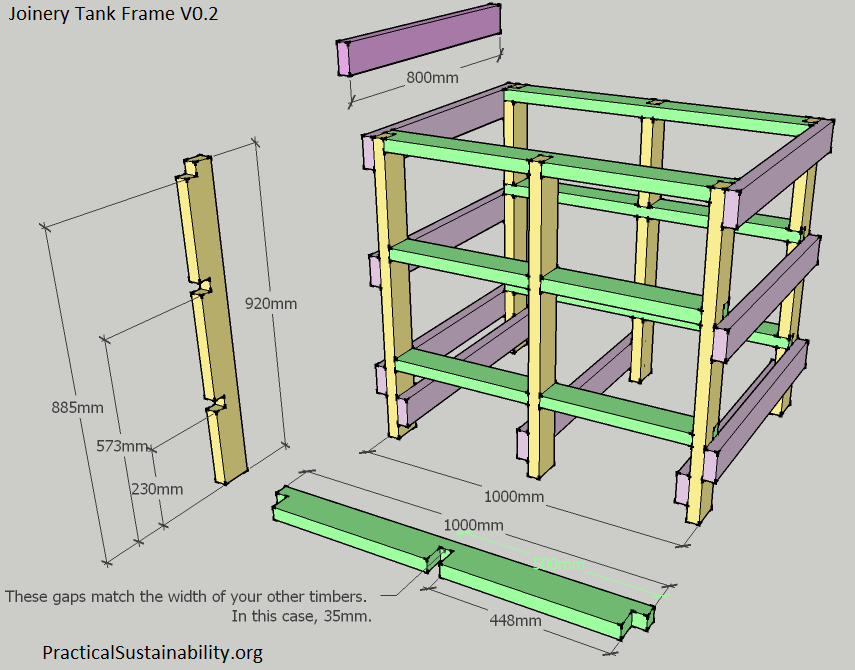
The Timber Tank Prototype #1 housed 12 Jade Perch, and was fed by both a PVC spray bar from the Header, and the output of the growbeds’ drain cycle via the integrated swirl filter visible in the picture (5).
The tank drained via slotted PVC pipe installed diagonally across the entire length of the interior, at the very bottom of the tank. This drain pipe was then permanently siphoned back to the main IBC sump via garden hose. (not shown in pic)
Timber Tank design 1 (Shown above):
The full article and DIY tutorial for the Timber Tank #1 can be found here : https://www.practicalsustainability.org/2016/11/14/timber-tank-prototype-1/
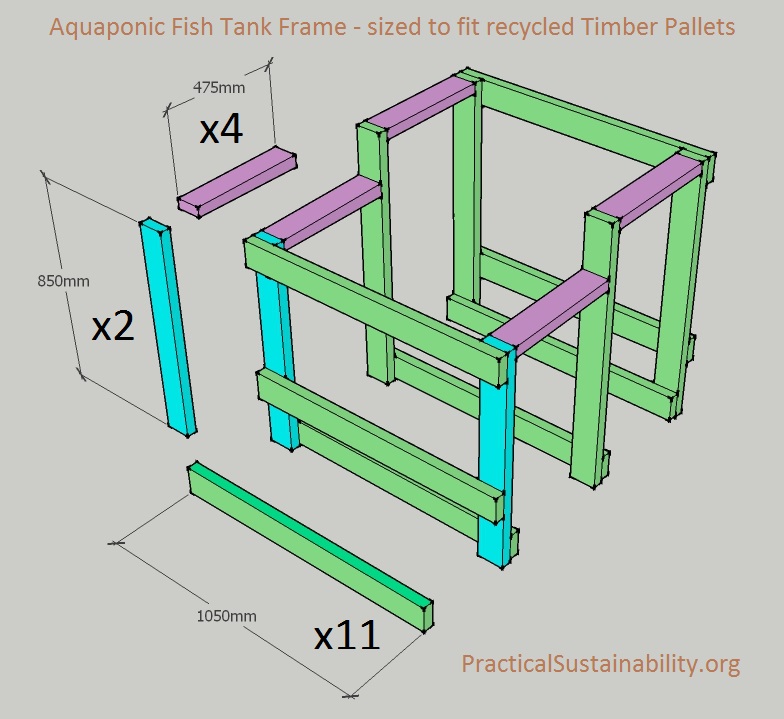
Timber Tank design 2 (Simplified):
The Timber Tank #2 frame design requires far lesser effort and woodwork skill. Full Atricle and DIY tutorial Here: https://www.practicalsustainability.org/2017/01/14/20-diy-aquaponic-fish-tank-recycled-pallets/
(8) Modular Growbeds
There were many types of prototype beds tested during the lifetime of this system, and they really need their own article with schematics and a proper explanation of how they work and what options are possible with various designs.
This system tested Gravity Growbed Mk#1 – Mk#6, but current tests are up to Mk#11 – so the future growbed article will focus on more refined designs than these.
Examples of early Gravity Growbeds:
(9) Simple bucket with bell siphon -flood and drains into the main IBC (6)
This drain bucket housed a colony of snails to help keep it clean. Water levels of the aquariums (3)(4)(4) matched the water level of this bucket due to the permanent garden hose siphons linking them.
(10) Twin Pumps
One large (70 watt) and one smaller pump (40 watt). Both pumps probably ran at lower actual wattage than listed maximum. The system would have run fine on the single 70 watt pump, but I wanted consistent pressure since a lot of the growbed tests relied on a stable flow rate over a period of months.
Both pumps led directly to the Gravity Header Manifold(2) via unbroken section of garden hose. Both hoses terminated low in the flow priority of the Header(2), so the pumps could be turned off one at a time, and the flow from the still-on pump would backwash down the off-pump’s garden hose and backwash the entire pump clean in seconds. Very low maintenance set up. If a pump failed, the siphon from the dead pump’s hose would only precede the biofilters in Header flow priority – so a pump failure was not a critical event.
(11) Reservoir
This was a simple 20L jug, to which all of the growbeds drained. This wa mainly to centralise the growbed outputs so one garden hose could lead back to the main tank, instead of 6 x individual 6mm polyvinyl tubes.
The volume of the reservoir could have been lower, but the added size made it more reliable since it could build up some pressure. The output back to the main tank went down and back up above the main tank water level during it’s journey – and the added pressure made starting this flow more reliable.
Results:
The system as a whole ran great for years, producing medium and large sized Perch, vegetables, fruit, herbs, and leafy greens. The only main annoyance was that some prototypes were high maintenance, requiring tending weekly or bi-weekly. Those problems have been mostly solved by this stage, and prototypes continue to be tested.
For the majority of the testing period, no additives were used with the system, beyond some basic PH up/down juice after a major (>100L) water addition.
Moving forward, hopefully I’ll have the time and funds to produce some more articles on the current Aquaponic unit and Growbed designs for 2018-2019! Thanks for reading.
If you want to join the Aquaponics Discord server to chat, here’s a link:
Follow on Facebook or Twitter for updates on new systems:
Tutorials and articles will always be free, and there will be no spam articles shared on these accounts ever.
Great work. Thanks for sharing
Thanks 🙂