Skip to content
Menu
Practical Sustainability Practical Sustainability
  • About Us
  • Animals
    • Goats
    • Pigs
    • Poultry
    • Rabbits
    • Vermiculture
      • Black soldier fly larvae
      • Earth Worms
      • Meal Worms
  • Bathroom
    • Compost Toilets
  • Building
    • Building with bottles
    • Clay or Mud bricks
    • Earthships
    • Timbercrete
    • Underground Living
    • Used Tires
  • Energy
    • Human energy
    • Hydroelectricity
      • Dammed Hydro
      • Run of the river
      • Tidal
    • Wind
  • Energy Storage
    • Compressed Air Energy Storage
    • Electrical
    • Gravity
    • Hydrogen
    • Kinetic
  • Food Storage
    • Bottling / Canning
    • Dehydration
    • Jam making
    • Pickling & Salting
    • Refrigeration
  • Growing
    • Hugelkultur
    • Mushrooms
  • Heating
    • Solar Air Heating
    • Solar Water Heating
    • With Compost
  • Water
    • Collection
      • Condensers
      • Fog Fences
    • Filters
      • Pre-filters
      • Slow sand filters
    • Storage
      • Barrels & IBCs
      • Rainwater Tanks
      • Swales
      • Underground Skeletons
  • Our Projects
Practical Sustainability Practical Sustainability
Solar oven practical sustainability

DIY Solar Oven prototype #1

Posted on February 20, 2017November 4, 2018 by Christopher Pickering

Cooking is something we all have in common, whether we do it ourselves or have someone do it for us. Almost half the world currently cooks by burning biomass directly; wood, coal, dung, waste plant material, etc. The other half of us burn fossil fuels such as gas, or use electricity generated from burning fossil fuels, neither of which is better overall.

All the energy we use comes from the sun, in one way or another – so why not cut out the destructive middle man?

In developing countries, especially in rural areas, 2.5 billion people rely on biomass, such as fuel-wood, charcoal, agricultural waste and animal dung, to meet their energy needs for cooking. In many countries, these resources account for over 90% of household energy consumption. – IEA.org

The sun’s energy equals around 1000 watts per 1m² / 10ft² when it reaches the earth’s surface. The solar oven is designed to concentrate that energy.

Figures from EssentialEnergy.com.au – although I have seen appliances with wattage 10- 25% lower listed by manufacturers:

  • Small to Large oven 1800 – 2400 watts
  • Small to Large hotplate 1000 to 2000 watts
  • Conventional microwave 1300 watts
  • Solar oven equivalent 1000 watts. (using array size from this tutorial)

Apart from the damage to our atmosphere, burning biomass for cooking affects health, devastates ecosystems, and increases poverty due to the time it takes to collect fuel daily. Check out this short article from Duke university listing basic adverse effects (Click here).

Quick video of the results:

Let’s build a solar oven!

This oven is just a prototype. I plan to design a version that is more compact and convenient as soon as I have the time and money. Cheers!

Solar oven frame plans.
Frame and oven plans.
Solar oven solar array layout. This was made to fit my lid - but to custom fit it just change the dimensions of the 'box' in the center, the rest will be the same as pictured.
Solar array layout. This was made to fit my lid – but to customize it just change the dimensions of the ‘box’ edges in the center, the rest will be the same as pictured.

Materials

  • A large roll of clear packing tape
  • A roll of aluminium foil / tin foil – I used approximately 15 meters.
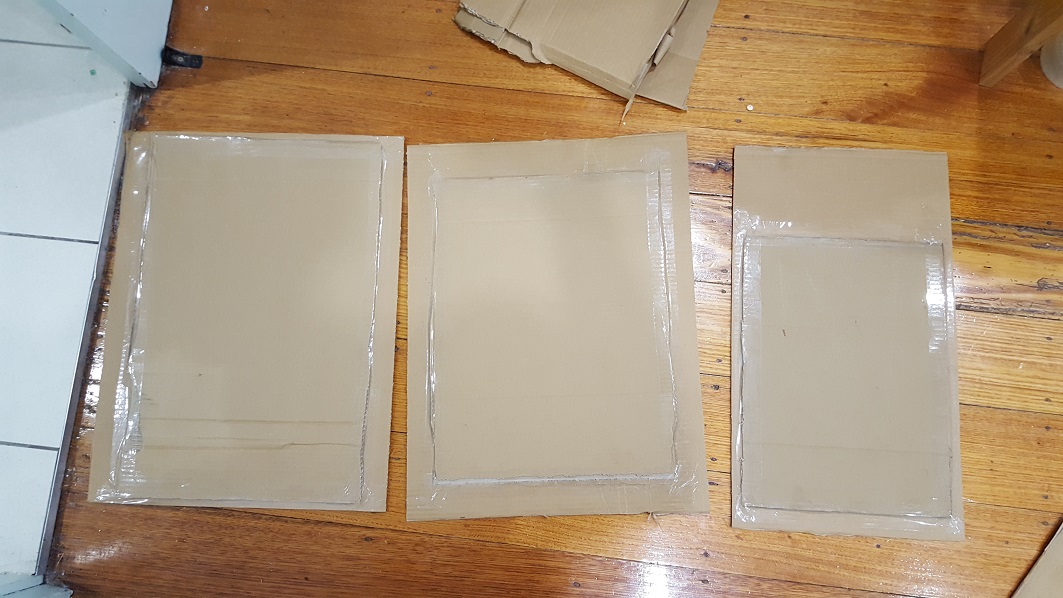
  • A large cardboard box, or several smaller ones.
  • around 60 short wood screws. You can use a lot less, but it won’t be as solid.
  • 6 small metal cutting screws OR 4 tiny bolts
  • A large oven bag
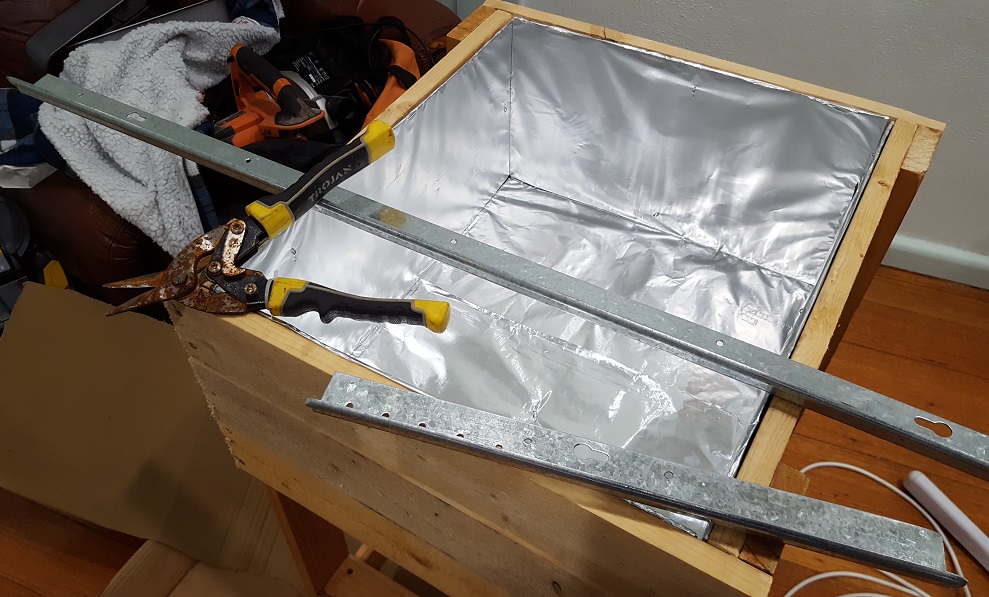
  • 2 meters of metal angle or rail.
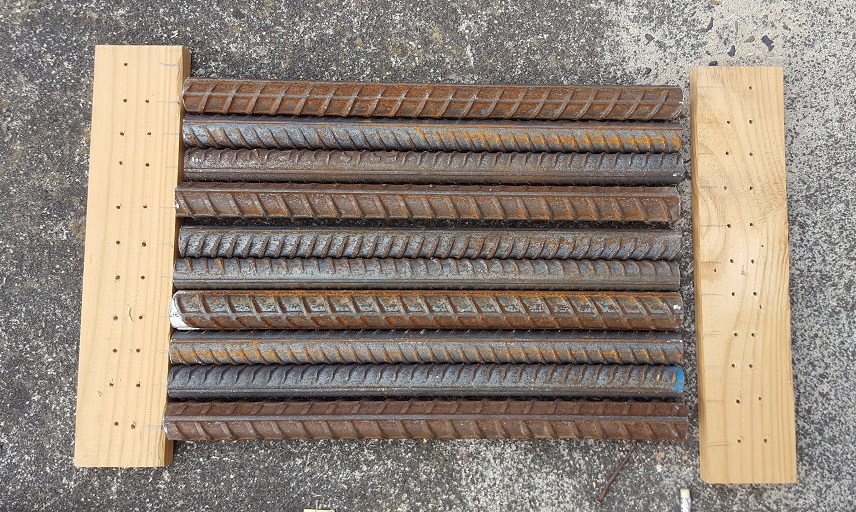
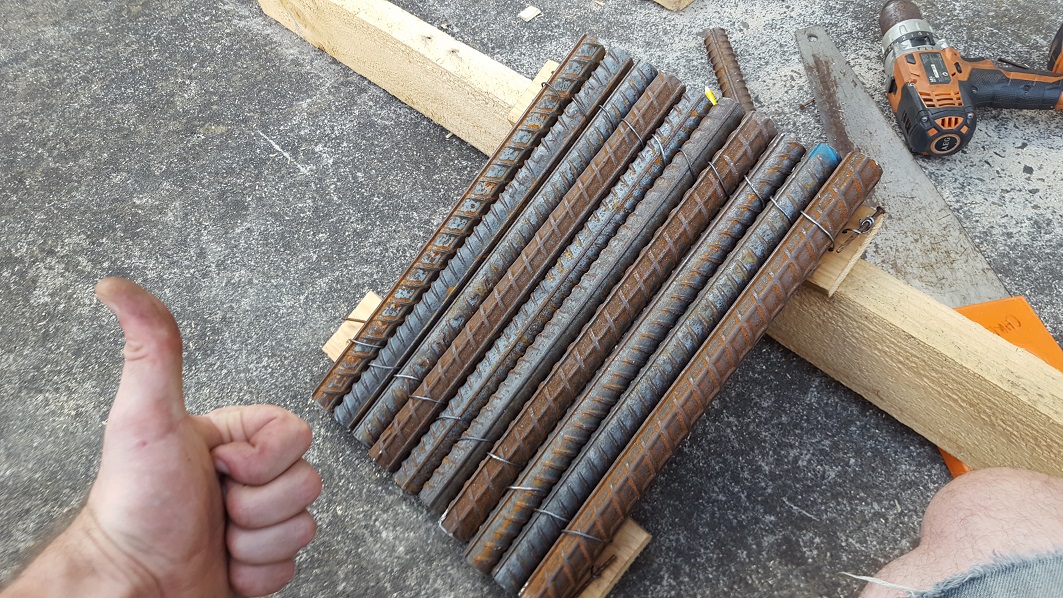
  • Some steel rebar OR a BBQ plate OR any other heavy objects that absorb heat
  • Timber – check plans.
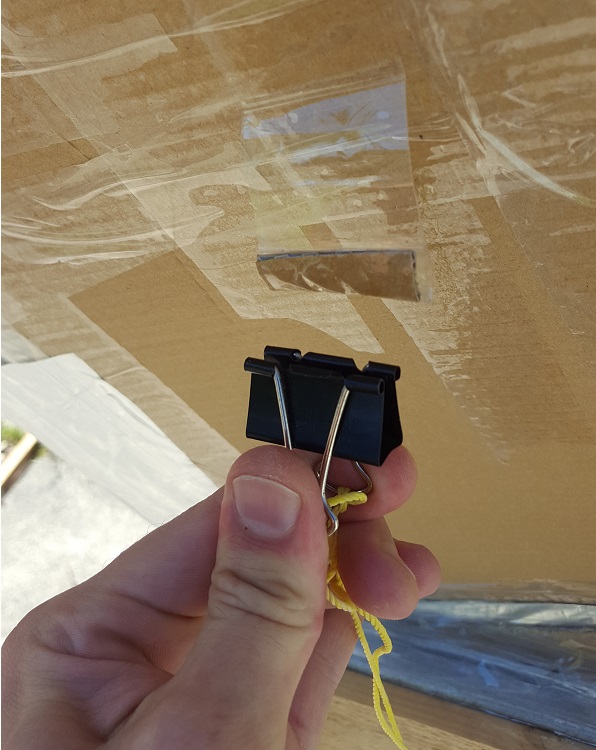
  • 4 binder clips or sturdy clothes pegs
  • A few meters of string

Tools

  • Scissors
  • A straight edge
  • Measuring tape
  • Screw gun or drill
  • Hand saw
  • Tin snips or hack saw
  • Angle grinder (only if you use rebar as a heatsink)

Ad to help pay for servers:

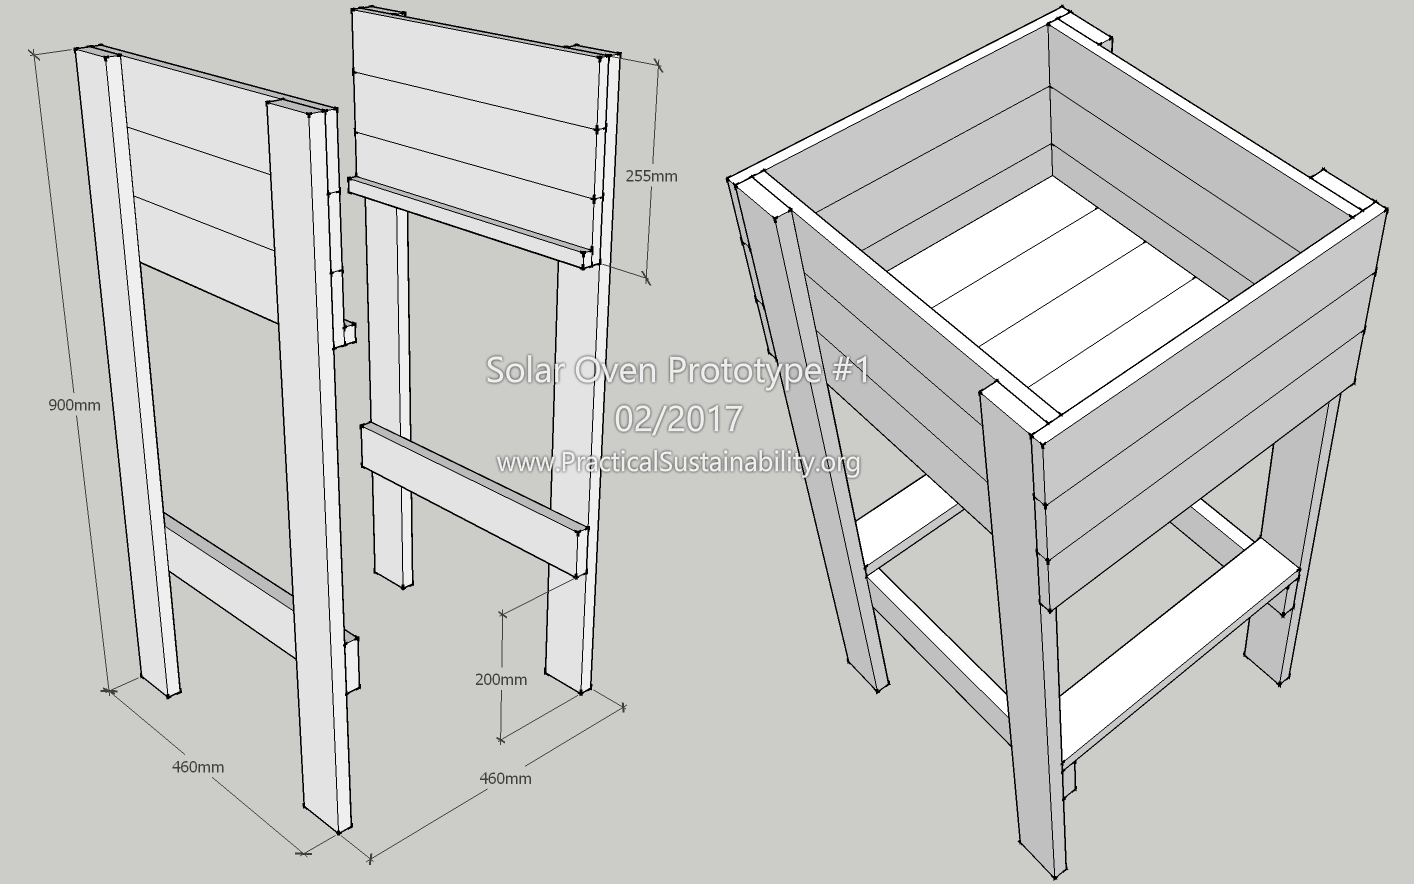
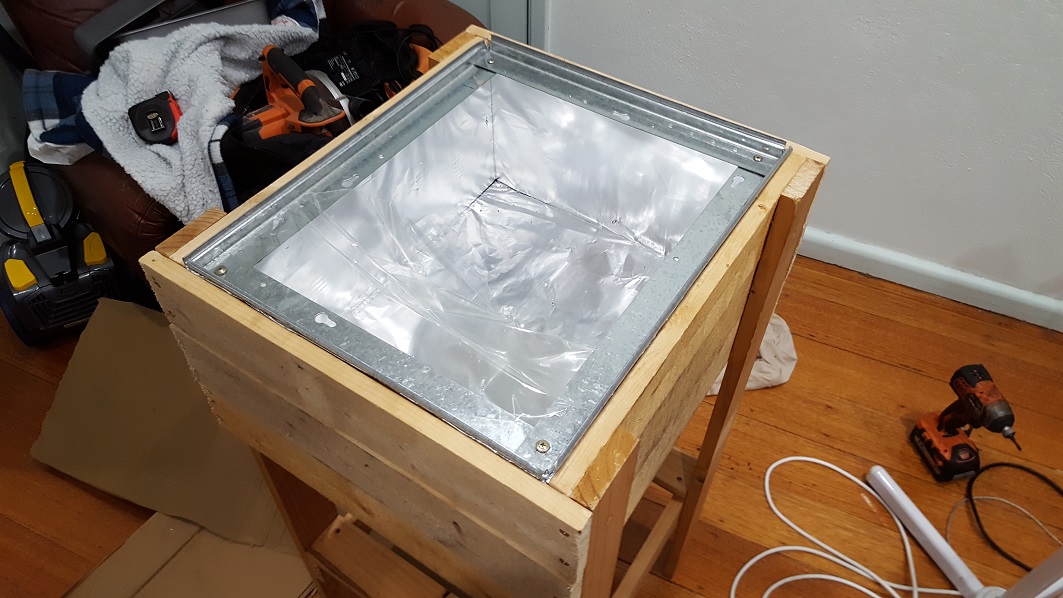
Making the timber base

Lay out your frame pieces as shown. Put ONE screw into each join, get it square (Click here for squaring tips) then once it is square put a second screw into each join.
Connect the two sides together the same way. One screw, square, then a second screw to lock it into place. Pilot holes are recommended when screwing into the narrow sides of your uprights. (Click here for pilot hole tips)
Connect the two sides together the same way. One screw, square, then a second screw to lock it into place. Pilot holes are recommended when screwing into the narrow sides of your legs, to avoid splitting timber. (Click here for pilot hole tips)
Add more timber to deepen the oven box. Don't make it too deep, you'll get less direct light reaching the bottom.
Add more timber to deepen the oven box. Don’t make it too deep, you’ll get less direct light reaching the bottom.
Attach a small piece of timber along the inside edge of your oven, as shown on the 3D plans. Put in 3 screws, and make sure the 2 near the edges go through the legs of the frame. Drill pilot holes (Click here for pilot hole tips)
Attach a small piece of timber along the inside edge of your oven, as shown on the 3D plans. Put in 3 screws, and make sure the 2 near the edges go through the legs of the frame. Drill pilot holes to avoid splitting timber. (Click here for pilot hole tips)

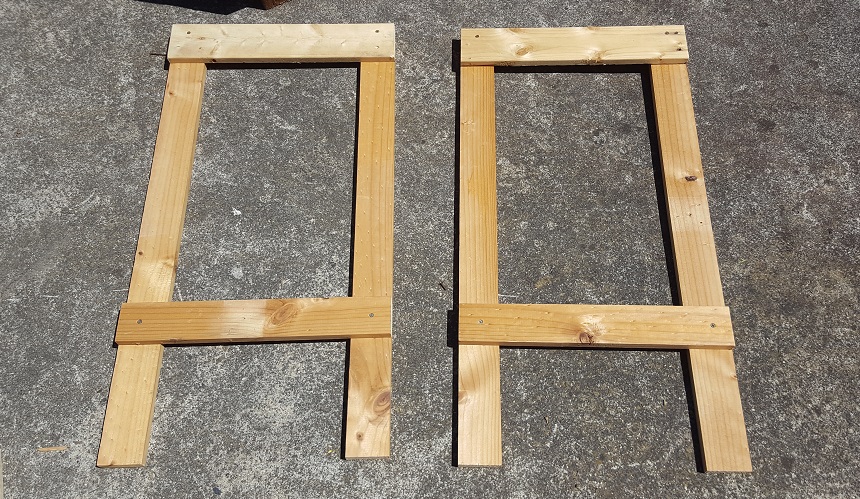
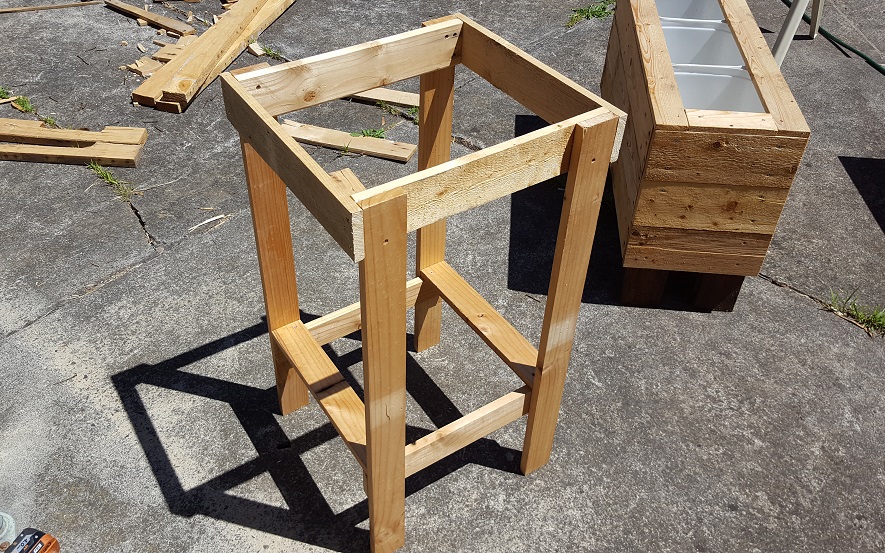
Cut some timber and fill in the bottom of your new oven box. Drill some pilot holes and put a few screws though into the timber flanges you added in the last step – you won’t need many, but adding more will help keep your box totally square for many years.

Ad to help pay for servers:

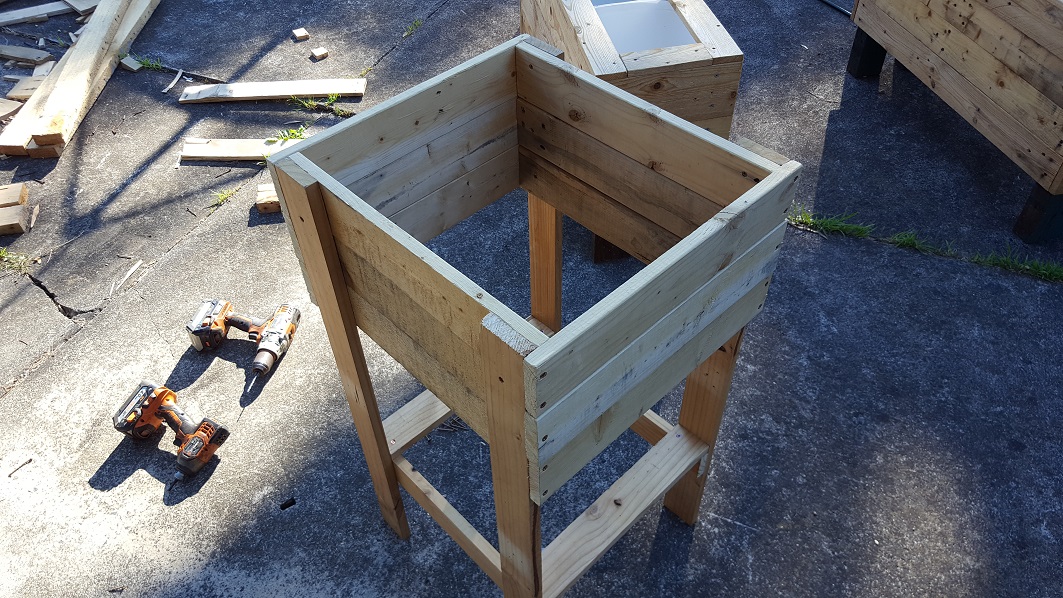
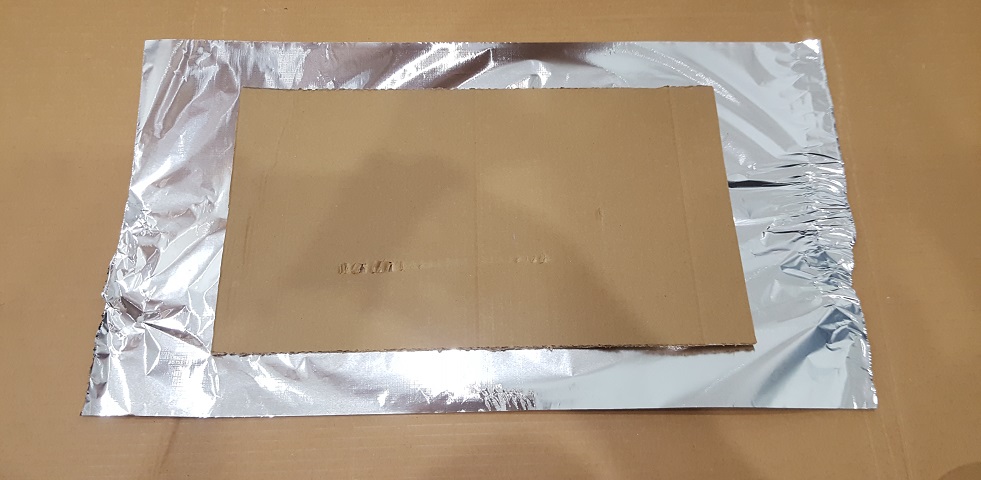
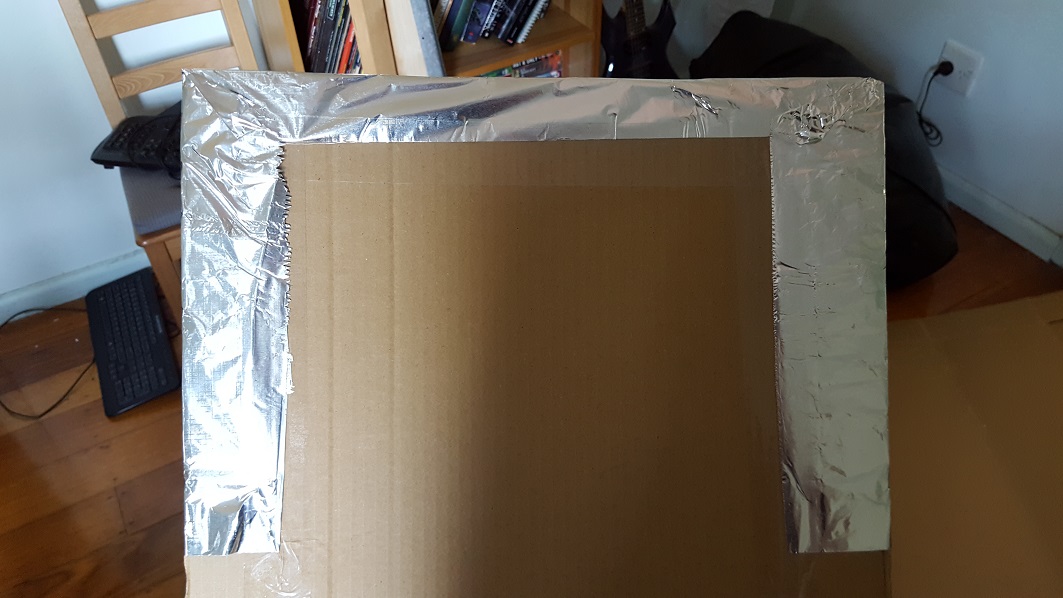
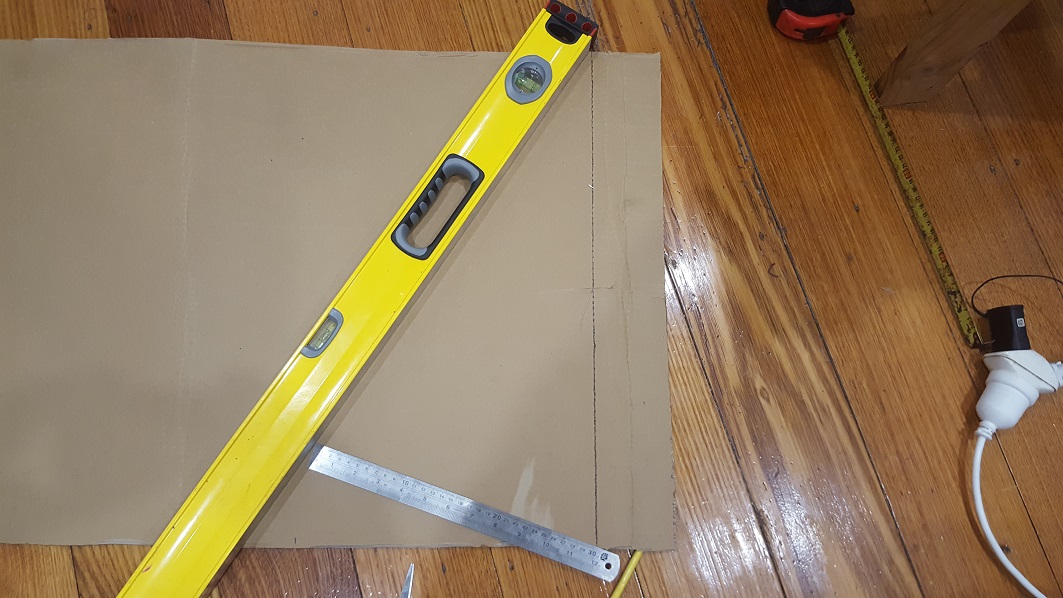
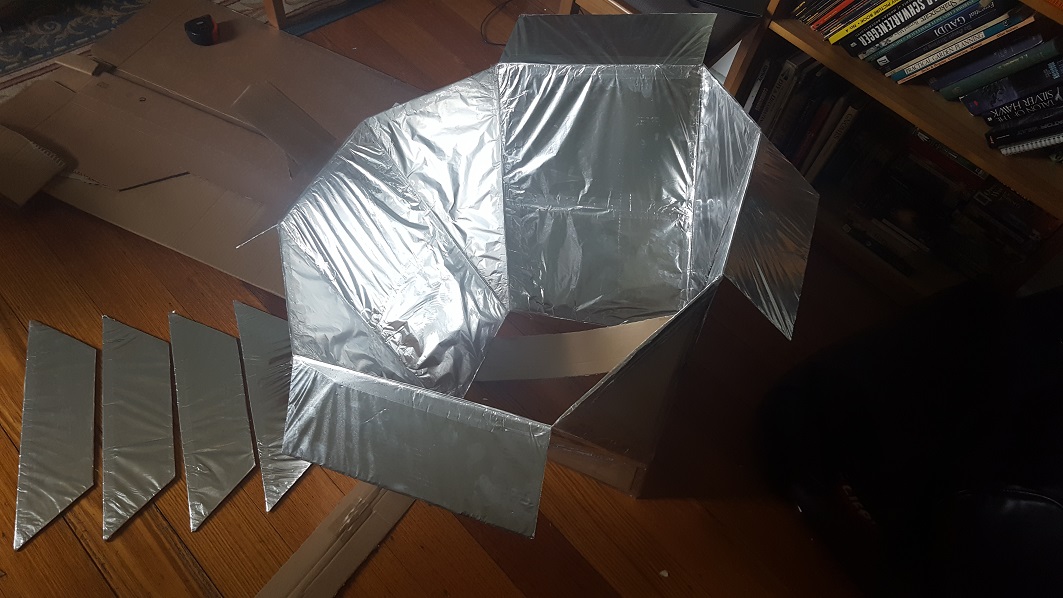
Lining the oven and making the ‘window’

Start with a cardboard piece for the bottom of the oven. Cut it to size, and tear off a larger piece of aluminium foil as shown.
Fold the foil over the edges, and tape it to the back. Do two opposite sides first, then the other two opposite sides. If you do two sides of a corner first, you risk getting it crooked.
Fold the foil over the edges, and tape it to the back. Do two opposite sides first, then the other two opposite sides. If you do two sides of a corner first, you risk getting it crooked. (pictured is a piece from the solar array)
After placing your bottom piece, add the sides. Make sure they are a bit lower than the timber sides, or your lid will damage them. I put in a few staples to hold them in place and then tapes all the way around the internal corners.
After placing your bottom piece, add the sides. Make sure they are a bit lower than the timber walls, or your lid will damage them. I put in a few staples to hold them in place and then taped all the way around the internal corners.
Cut 4 pieces of metal rail / angle to fit the inside edge of your oven. I used a spare sliding door rail and cut it with tin snips - but there are many possible materials that would work here. Metal angle is probably the cheapest and most common material you could get for this.
Cut 4 pieces of metal rail / angle to fit the inside edge of your oven. I used a spare sliding door rail and cut it with tin snips – but there are many possible materials that would work here. Metal 90 degree angle is probably the cheapest and most common material you will find.
Using your metal cutting screws, assemble the lid. Once it fits, make sure to put two screws in at least one corner to hold it square. I put two screws in opposite corners, with one screw in the other opposite corners.
Cut your oven bag open, so it is a single layer of plastic, and attach it to you lid. Make sure there are no unsealed bits where hot air could escape.
Cut an oven bag open so it is a single layer of plastic, and attach it to your lid. Make sure there are no unsealed bits where hot air could escape.

Ad to help pay for servers:

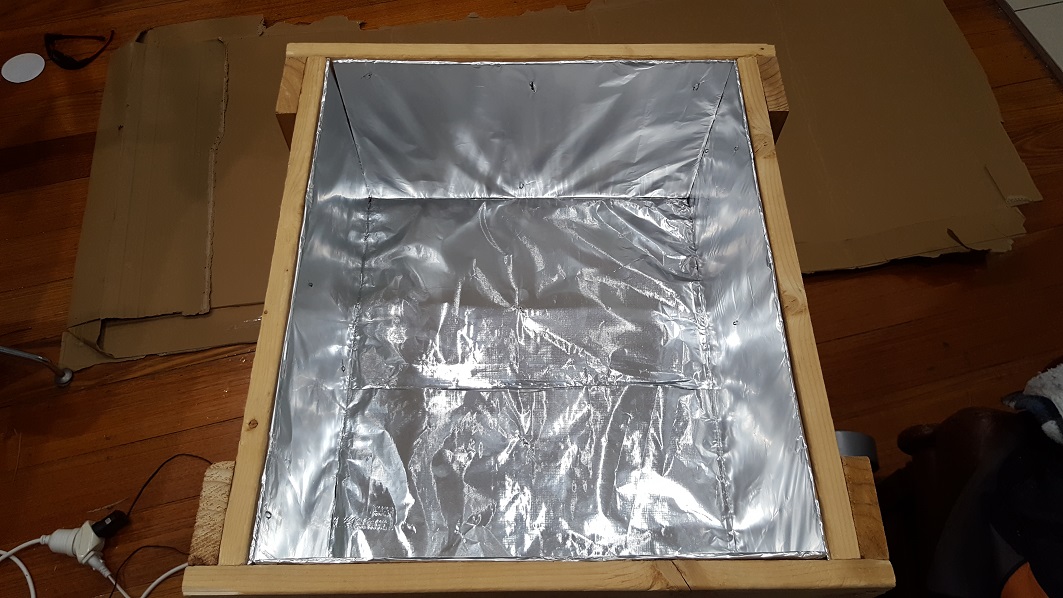
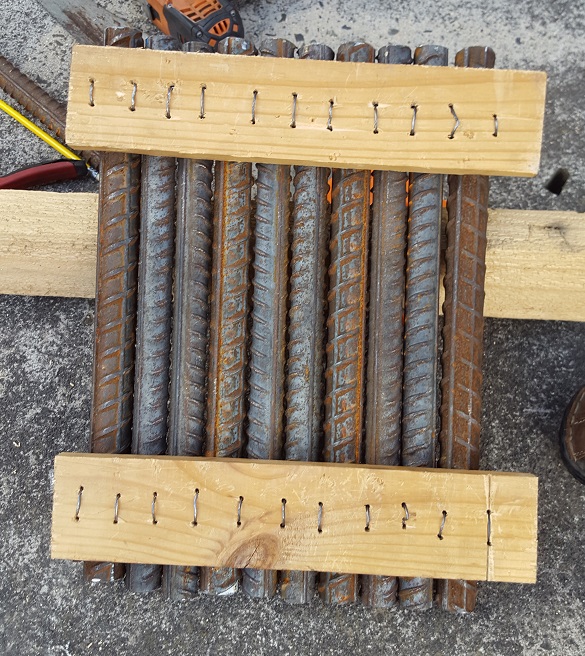
Making a ‘heat sink’ to store heat

The main reason you want a heat sink is to keep the temperature stable. Air does not hold much heat, so if a cloud passes in front of the sun, or you open the lid to stir your food, the temperature inside can drop drastically.

A heat sink stores energy so that when your air temperature fluctuates it will return to normal quickly – it’s the same reason you pre-heat your oven at home.

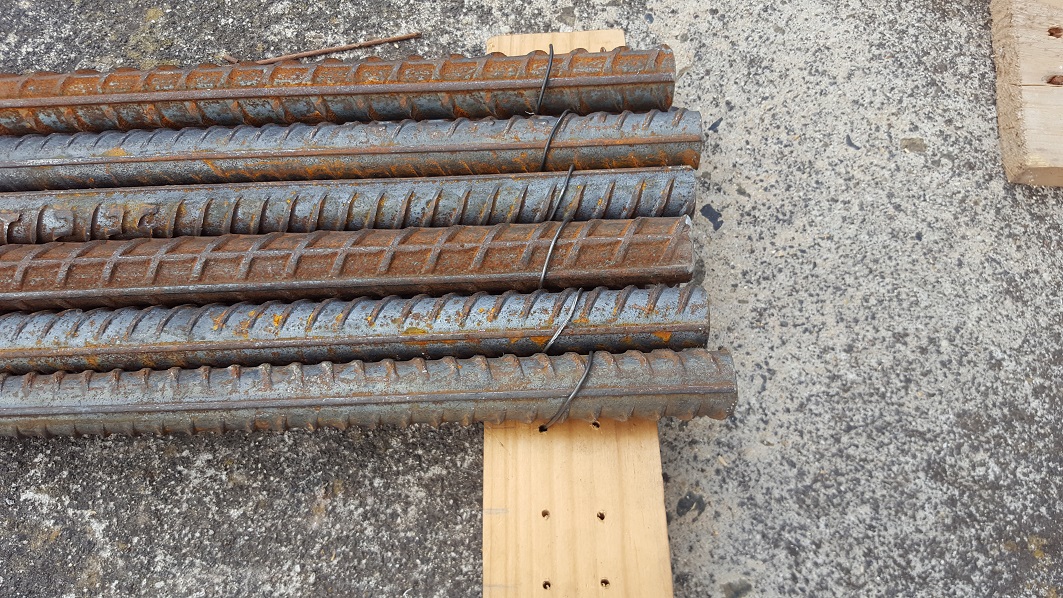
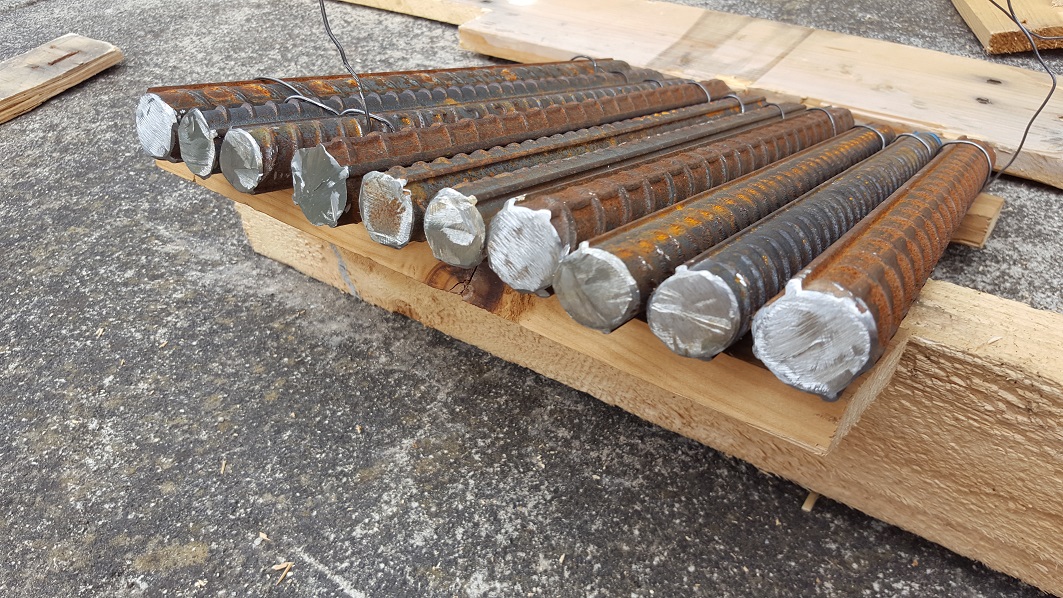
For this prototype I used steel Rebar off-cuts from a heavy construction job I did last year, but you can use any objects that are dense and heavy – the denser the better. A thick BBQ plate would work great, but even a few bricks would work fine. Just make sure they are supported so they don’t sit directly on the bottom of your oven – allow air to flow freely around them.

Darker is better! Paint your heat sink black if you have access to paint that can withstand high temperatures. I can’t afford it right now, but I’ll do it over the next few weeks while giving the oven a full field test.

Cut your steel to length, making sure it is short enough to leave a generous gap when placed in your oven.
Cut your steel to length, making sure it is short enough to leave a generous gap when placed in your oven. Cut two pieces of timber as shown, Mark lines where each bar will sit. Drill two holes on each mark as shown.
Using wire or any other material that can withstand high temperatures, tie your bars to your timber.
Make sure there are no sharp edges, you'll have to remove this for cleaning occasionally, and metal burr cuts on your hands can be avoided.
Make sure there are no sharp edges, as you’ll have to remove this for cleaning occasionally, stay safe. I hit mine with an angle grinder.
Bottom view.
Done! Spray it black for even more power - if you can find high temperature paint.
Done! Spray it black for even more power – if you can find high temperature paint.

Ad to help pay for servers:

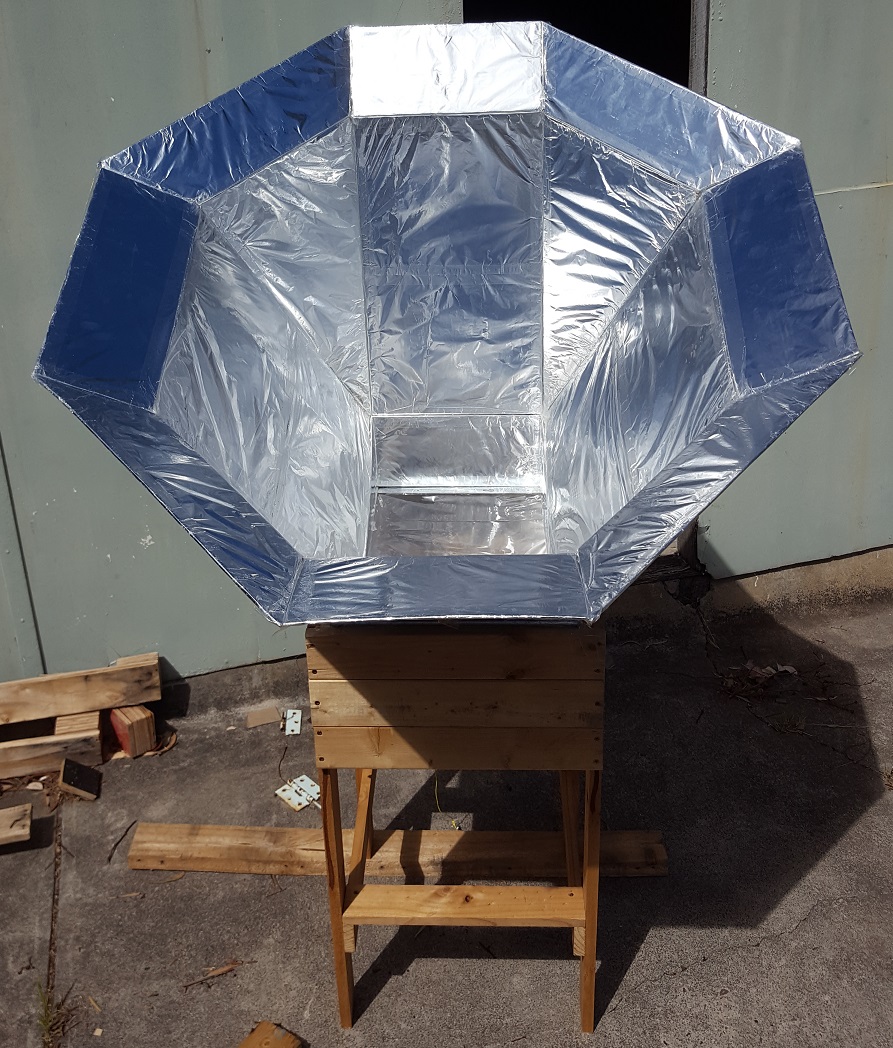
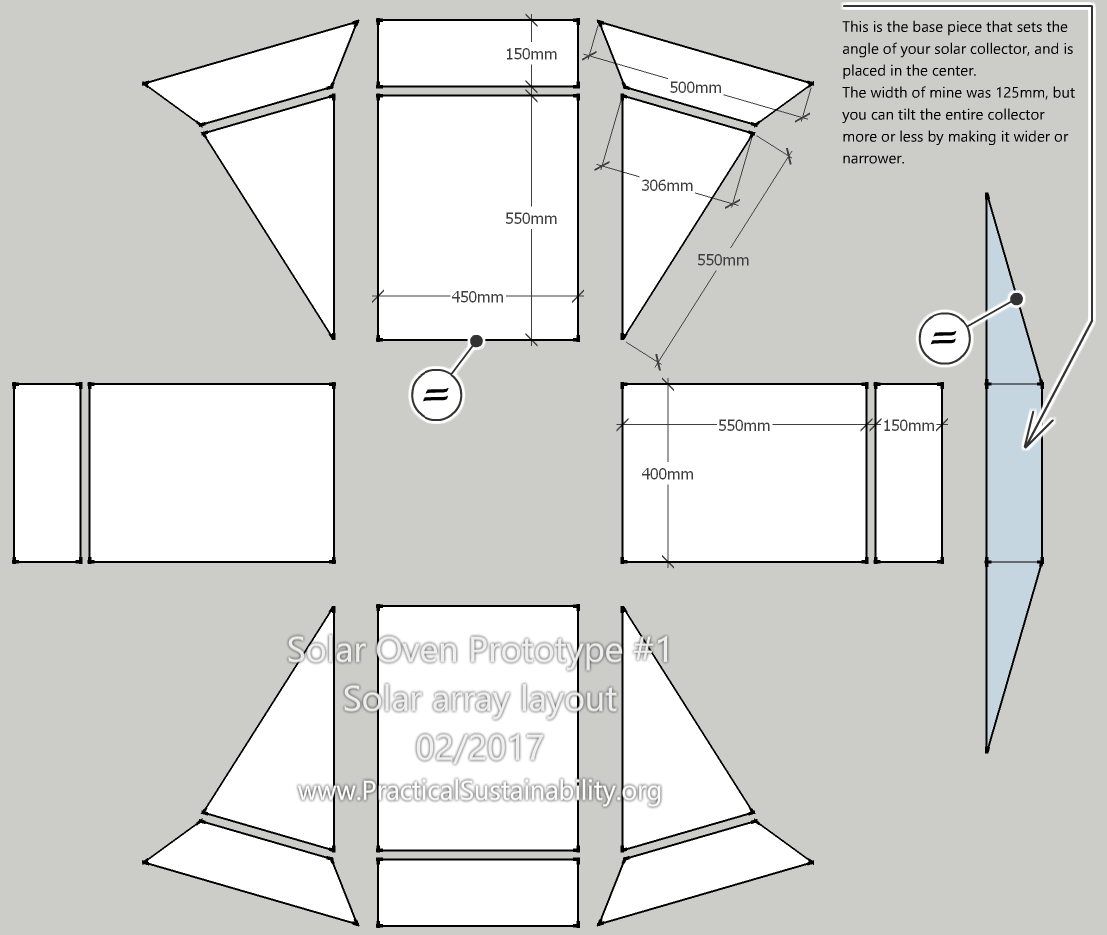
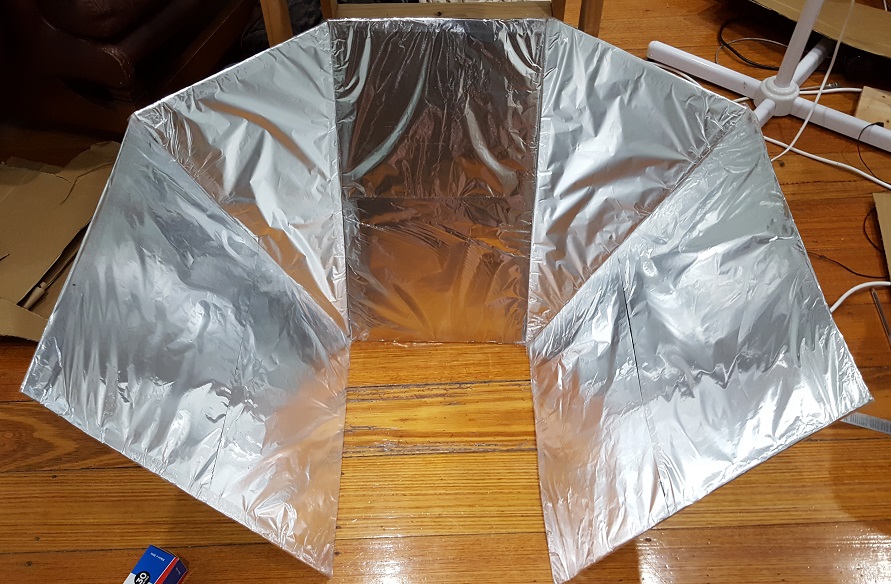
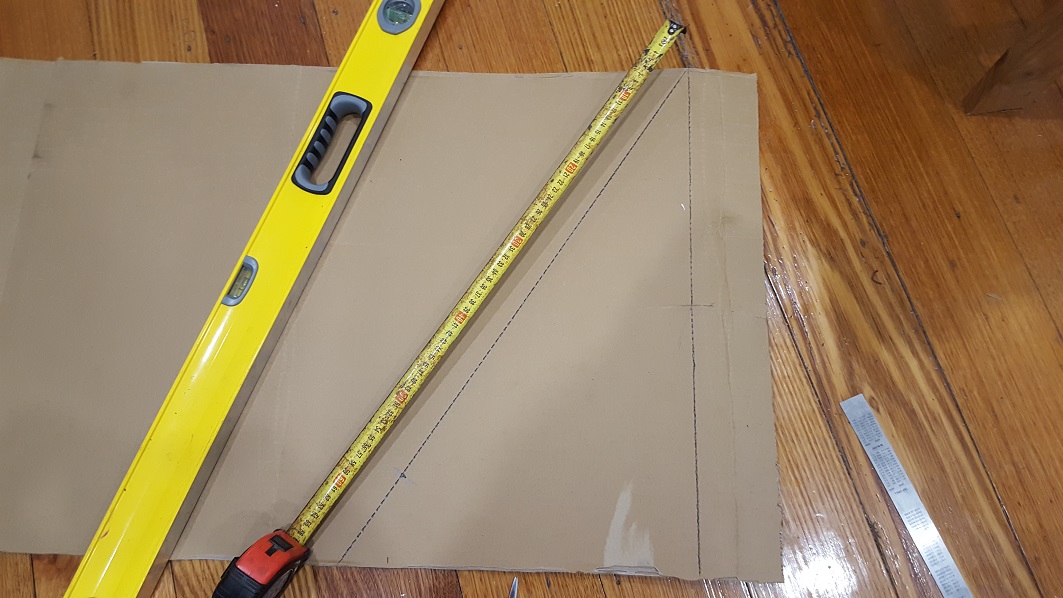
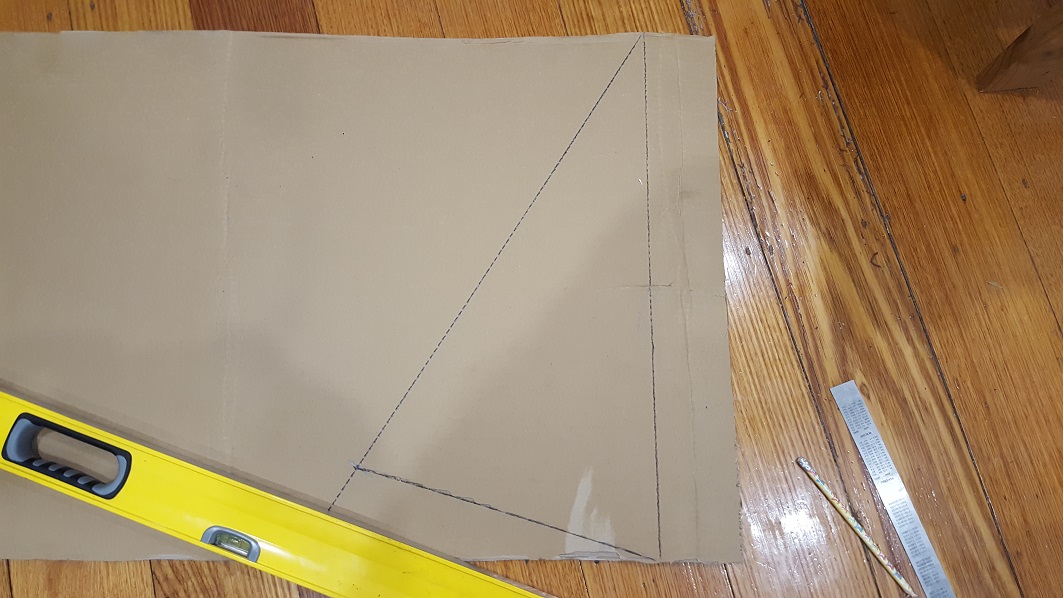
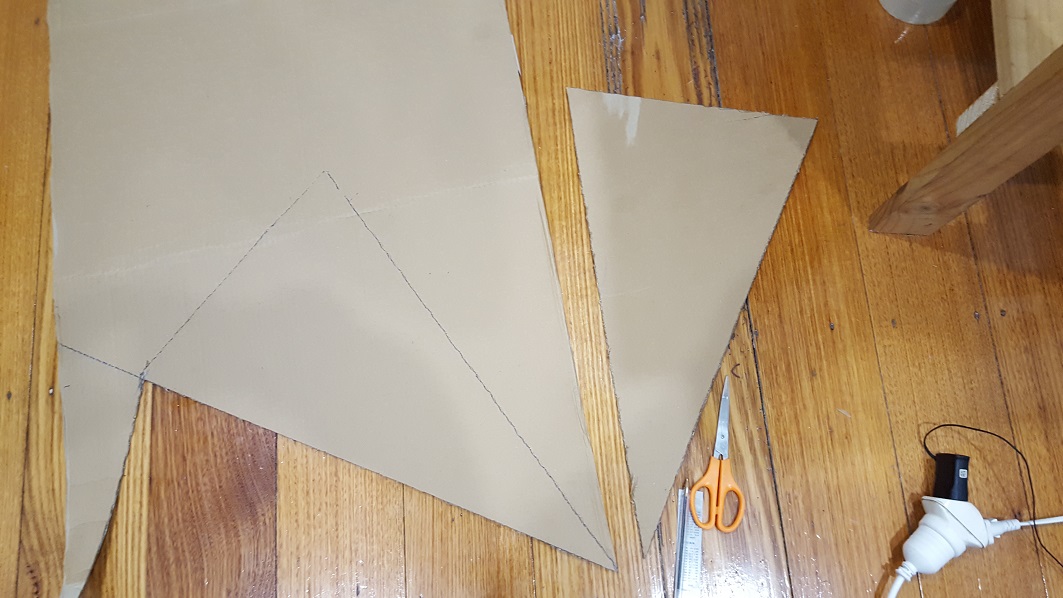
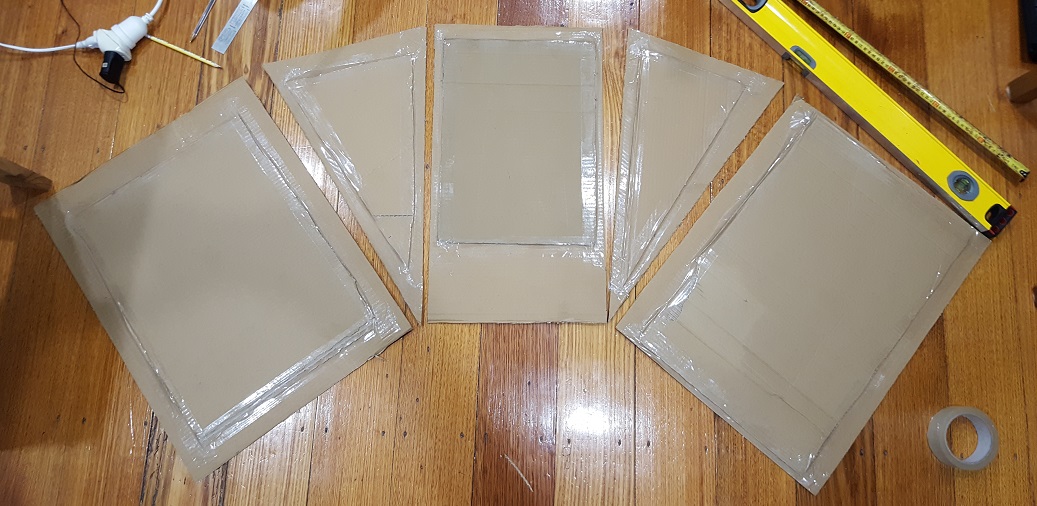
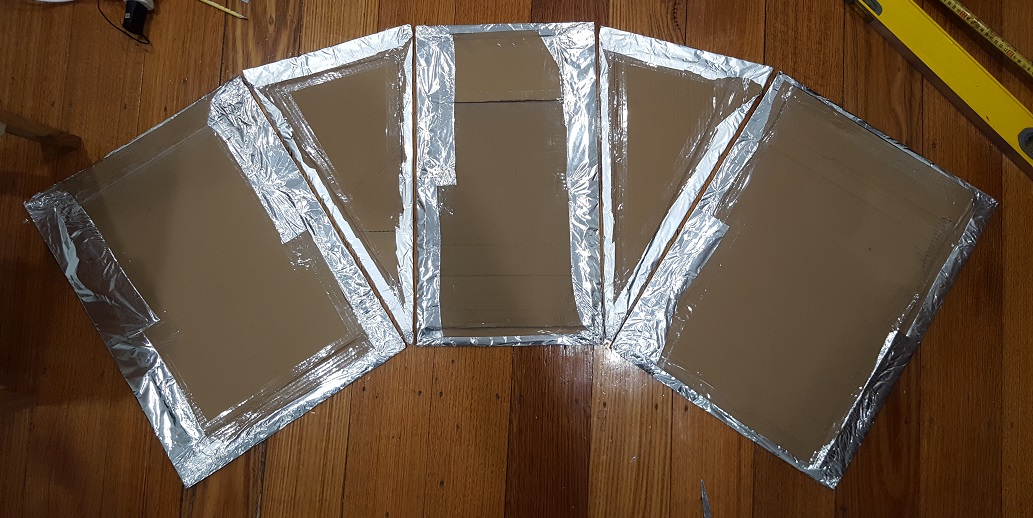
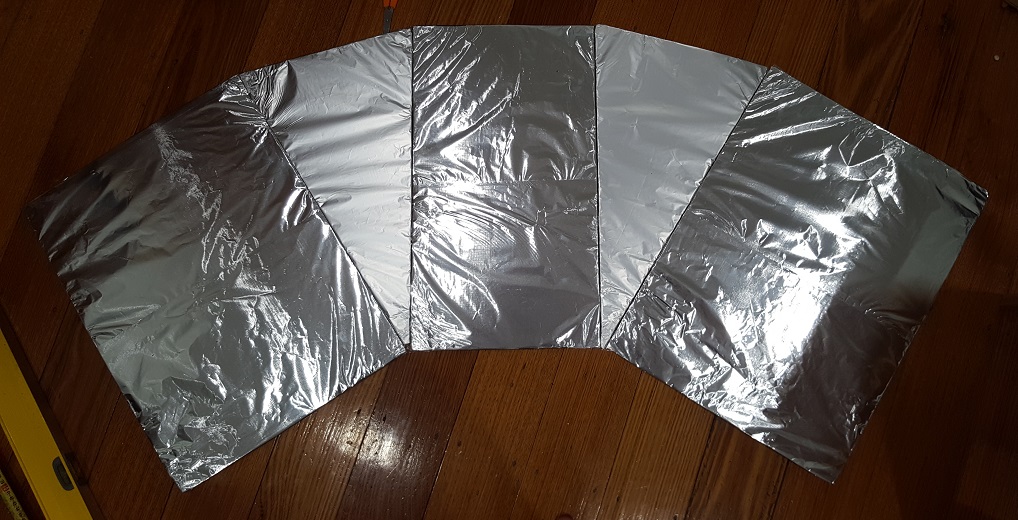
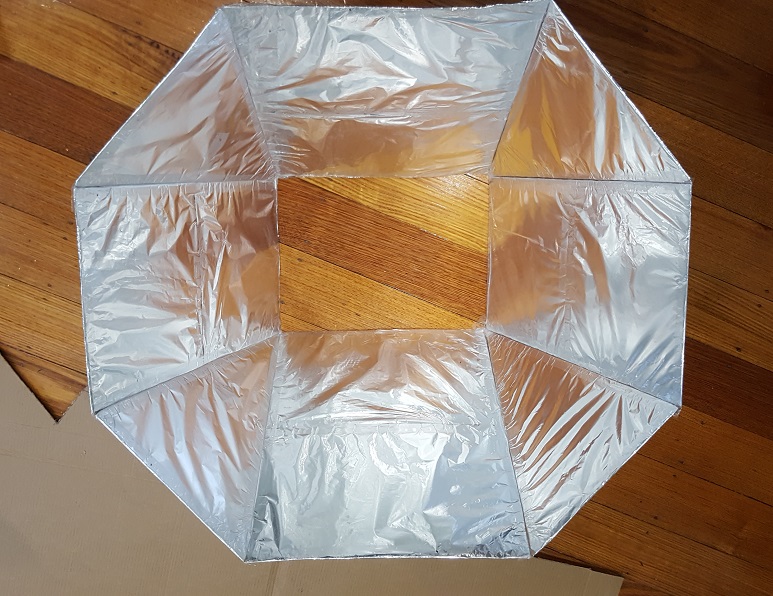
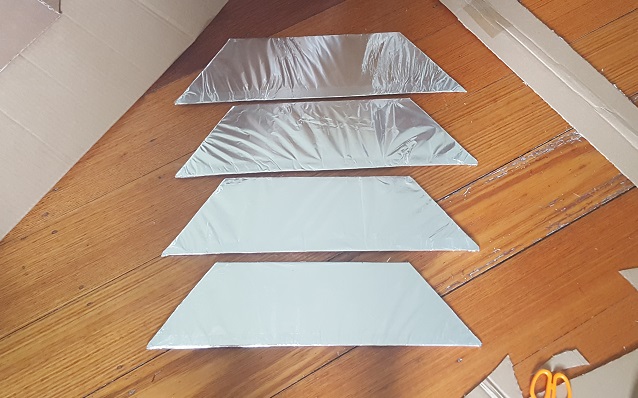
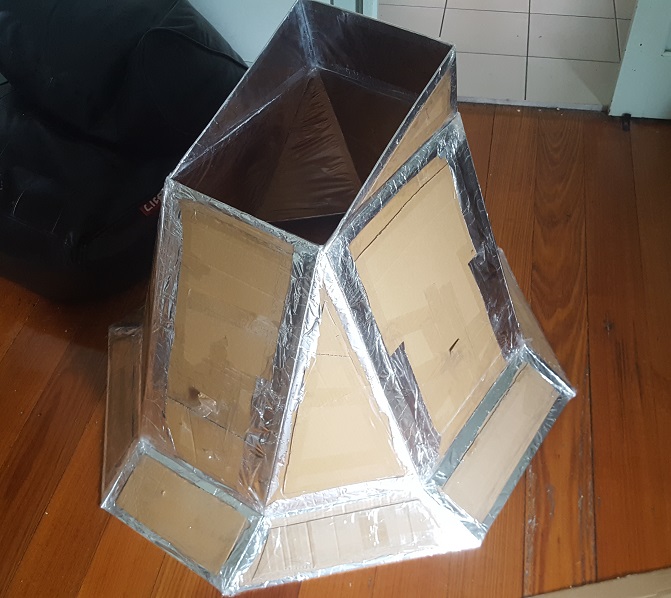
Making the Solar Array

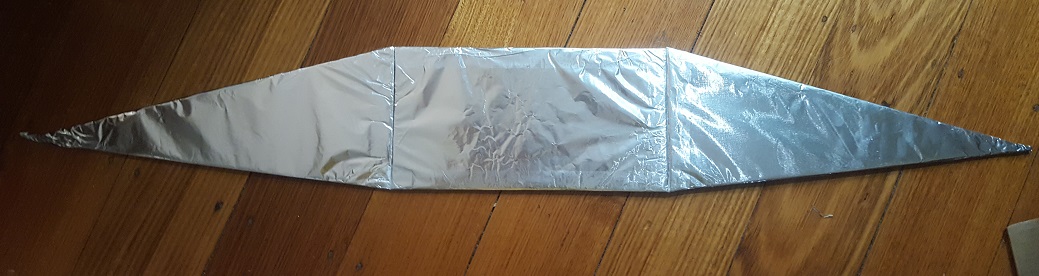
Be careful – if you build the solar array using dimensions listed at the top of this page, it will just BARELY fit through a standard size doorway. If you have narrow doors in your house or will be taking it in and out frequently, I suggest making it slightly smaller. I store mine in a garage where it doesn’t matter.

Since this project was a prototype test, I started building this small array – then expanded it later.

Small solar oven array
The first section I built and tested.
Cut rectangles for the three main sides. For added strength, tape a scrap piece of cardboard to the back of each panel.
Cut rectangles for the three main sides. For added strength, tape a smaller scrap piece of cardboard to the back of each panel.
Make a triangle by tracing one straight line, and angling a straight edge out from an end point as shown. I roughly measured 300mm for the short side of the triangle as shown. Mark a line down the long edge of the triangle when it looks roughly correct.
Cut a 550mm strip of cardboard, then make a triangle by tracing one square line, and angling a straight edge out from an end point as shown. Roughly measure 300mm for the short side of the triangle. Mark a line down the long edge of the triangle when it looks roughly correct.
Measure along your new line and mark a point at 550mm.
Connect your two lines, and cut out your first triangle.
When cutting out more triangles - trace your original to make sure they match.
When cutting out more triangles – trace your original to make sure they match. No need to measure!

Ad to help pay for servers:

Roughly cut some smaller triangles and tape them to the back for strength, as shown.
Cover them with aluminium foil, and secure firmly from the back, with tape.
Cover them with aluminium foil, and secure the foil firmly to the back, with tape. Lay your pieces out as shown, leaving a small gap between each. Tape them together by running tape all the way along each join.
Flip it over, and tape each join on the front face.
Ta da!

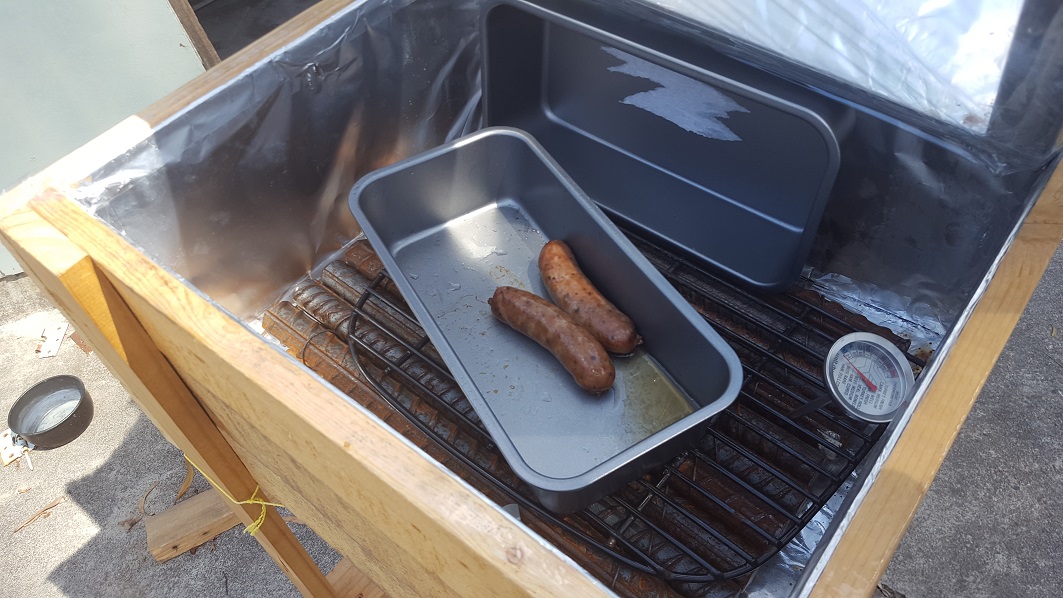
I tested the oven at this stage, and it achieved 80-90C  / 176 – 194F under the hot Australian sun. This is enough to:

  • Fully reheat pre-cooked food
  • Do some slow cooking in a large pot
  • Heat treat a few kilos of produce for bottling
  • Pasturise water
  • Cook raw food (barely).

Ad to help pay for servers:

Lets go bigger!

Craft more pieces the same way as above, completing a full 360 degree array as shown.
Fold your array into shape, and tape.
This is the piece that sits underneath your main solar array, and sets the angle of the entire array.
This is the piece that sits underneath your main solar array, and sets the angle of the entire array. Middle piece pictured is 125mm x 400mm.

The size of this base piece determines the angle of the whole array. During summer, you’d want it thinner so the array points almost straight up at the sun. During winter – or if you live towards the poles of the earth, you’d want it wider so the array tilts more. I recommend tilting your array on a flat surface to the angle you want, and measuring the gap between the high side and the floor. Make it narrower rather than wider, you can always add a bit more to it during winter to increase the tilt, then remove the extra during summer.

Cut your four pieces for the corners of the upper lip. Cut out one first, then trace that to make the next three. This will make sure the final product will be symmetrical, even if something is slightly wrong.
Craft and attach the four 'flaps' as shown.
Craft and attach the four ‘flaps’ as shown.
Tape it all together!
Make sure the array is taped on both sides of every join. Also tape along the top and bottom edges, so the foil won't get damaged if you bump it into something. Make sure ever you has tape that reaches from cardboard to cardboard - totally bridging over the foil, or it may tear.
Make sure the array is taped on both sides of every join. Also tape along the top and bottom edges, so the foil won’t get damaged if you bump it into something. Make sure every join has tape that reaches from cardboard to cardboard – totally bridging over the foil, or it may tear.

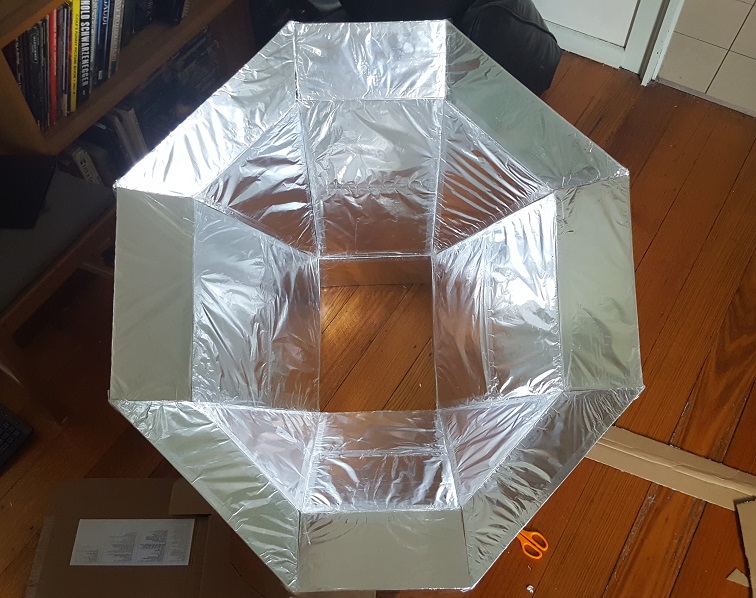
Solar array complete! You can add more cardboard to the outside to strengthen it if you live in a windy area. Place your solar array onto your ‘windowed’ lid piece from earlier, and tape it securely. Make sure it is solid, but try not the get any tape on the oven bag ‘window’ section as it will stop some light getting through.

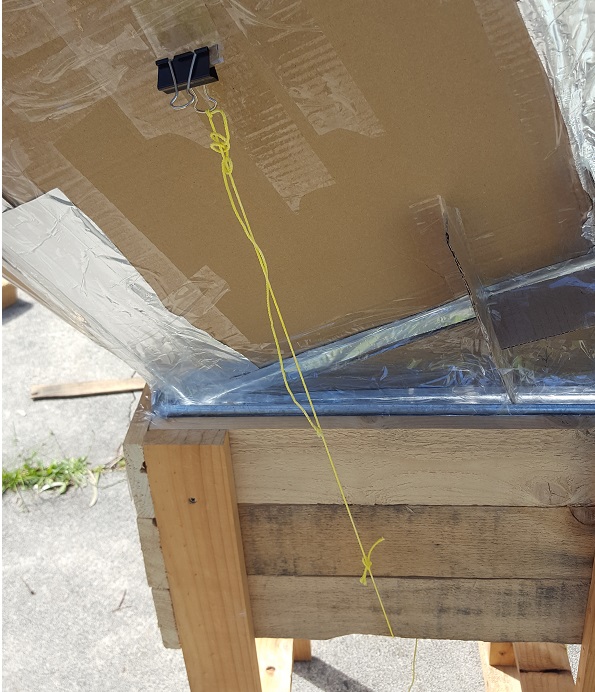
All that’s left is to add a way to tie the lid to the oven so it won’t blow away – I used some string and a clips:

Cut a small piece of cardboard, and stick it inside a loop of tape and attach it as shown. Stick some more tape around where it meets the cardboard.
Cut a small piece of cardboard, stick it inside a loop of tape and attach it as shown. Stick some more tape around where it meets the cardboard on the solar array. I did this in the center of all 4 sides of the array, check the video at the start of this page for a better look.
Put a screw or nail in under your oven, and tie the string to it. Clip the clip onto your anchor point as shown, then wind the string around the screw/nail to pull it tight.
Put a screw or nail in under your oven, and tie the string to it. Clip the clip onto your anchor point as shown, then wind the string around the screw/nail to pull it tight. I’ve used it during pretty high winds with no problems.
Start cooking!
Start cooking!

DONE!

The oven hasn’t been fully tested yet, but in trial runs the temperature reached 130c / 266f – which was as high as my crappy temperature monitor can go. Water splashed onto the steel rebar boiled off within seconds.

Fully documented results are coming when I have free time on a few proper sunny days.  The goal is for this oven to cook a pizza, since if it can do that – it can do just about anything – and I’m confident it will!

***Update***

Pizza cooked in the solar oven

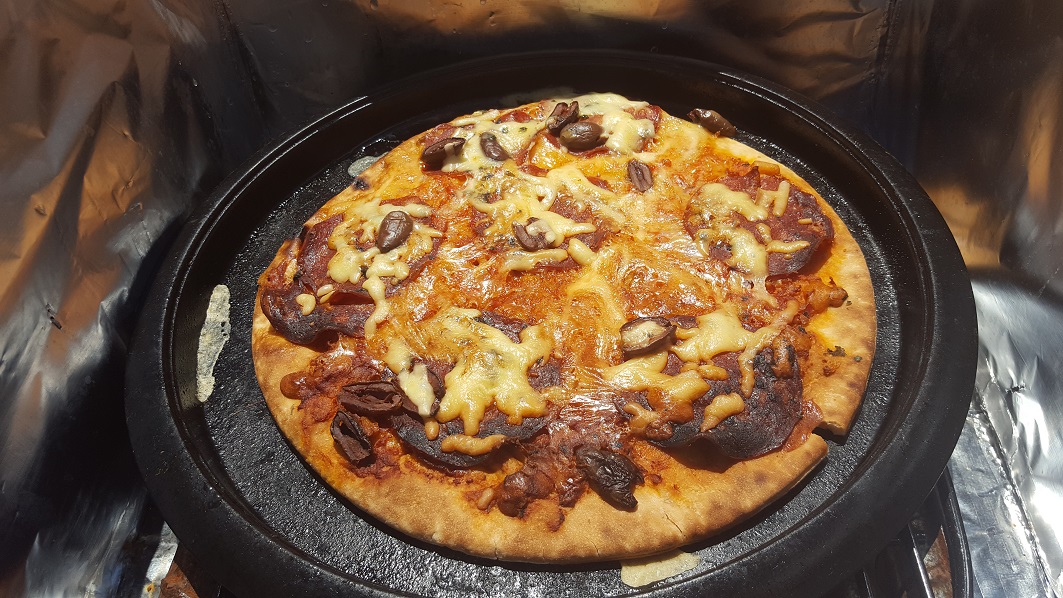
Success! Pictured is an example of how hot the oven can get.

If anything, the Australian sun was TOO hot with a solar collector as large as this for something like pizza with a large surface area.

It was a learning experience though, and it wasn’t to hard to tweak the cooking process to avoid the kind of burning pictured. Simple things like aiming the array directly at the sun during oven preheating, then allowing it to slowly become misaligned and less directly powerful during the cooking process worked for Pizza.

Happy cooking everyone!

1 thought on “DIY Solar Oven prototype #1”

  1. Pingback: A Solar Oven Made with Aluminum Foil and Cardboard | Make:

Leave a Reply Cancel reply

Your email address will not be published. Required fields are marked *

Follow us on Facebook!

Follow us on Facebook!

Follow us on twitter

My Tweets

Search posts by Category:

Recent Posts

  • Practical Sustainability funding and growth news
  • Aquaponic Test System (2014 – 2017) Design Review
  • D.I.Y Two level planter box tutorial, with free plans
  • Aquaponic Nexus Tank planned prototype
  • Gravity Header Manifold prototype #3 tutorial

Subscribe to Blog via Email

Enter your email address to subscribe to this blog and receive notifications of new posts by email.

Join 15 other subscribers
©2025 Practical Sustainability | Powered by WordPress & Superb Themes