Spray bars aren’t just for aerating your water, they also control the direction and flow of water currents in your fish tank. This article covers DIY spray bars, and some basic design options.
The actual act of building a spray bar is easy, it’s just a pipe with a row of holes in it (see below). The hard bit is deciding what kind of flow best suits your tank. Basic examples are below to get you started, but many kinds of flows or currents are possible with a few strategically placed spray bars.
If you have DIY spray bars in your tanks, send us with some photos! We’d love more examples of spray bars. We only did basic tests in 1000 L, 550 L, 100 L and 70 L tanks.
If you are interested in tweaking your flows to get them super efficient for whatever purpose – check out saltwater aquarium communities and technology. Hobby coral reef tank owners have been optimizing and directing water currents in their tanks for many years.
The main goal is to make sure there are no stagnant areas in your tanks.
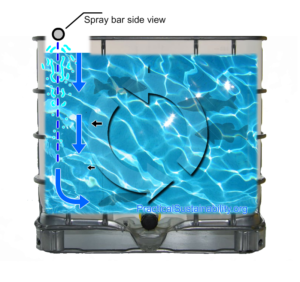
Vertical flow

Vertical flow
- Recommended for smaller tanks < 800L.
- Not optimal for use with round tanks
- Good for long, narrow tanks
- Provides reliable circulation in rectangular tanks
- Leaves the surface water relatively calm – fish tank is easier to inspect
- Will kick up dirt and debris from the bottom of your tank – bad for some uses, good for others
- Some fish types do not like strong vertical currents
- Can prematurely ‘sink’ your fish food if you use floating pellets or similar.
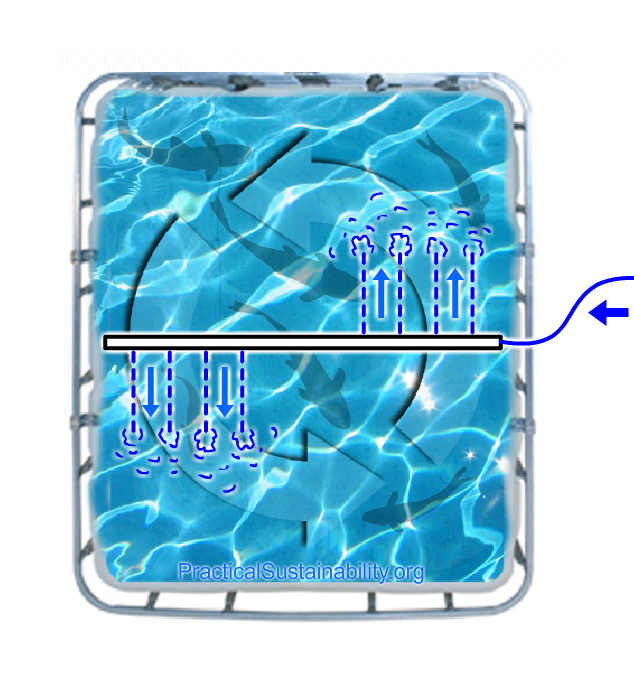
Horizontal flow
The horizontal swirl action is best for most fish tanks, as it creates a “Laminar Flow” – meaning it flows in the same direction everywhere in the tank, relative to the fish. They have evolved in horizontally flowing water, and generally prefer it.
- Current flows evenly around the tank
- Flow intensity decreases as it gets deeper – leaving heavier solids undisturbed, and giving the fish somewhere to rest.
- Not good for long narrow tanks
- Current may not reach the bottom of your tanks if there are structures or tank decorations blocking flow.
Do it yourself!
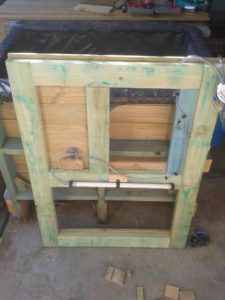
- Cut a length of PVC pipe to fit your tank. Don’t make it too tight, you need room for your water-in tube (pic below)
- “Bottle Top” both ends. (Click Here to see tutorial)
- Unscrew one bottle cap.
- Drill a hole in the cap, to fit your water-in pipe.
- Silicone seal the water-in pipe to your bottle cap, on both sides.
- Leave to dry for 24 hours. Plumbed cap ready to be screwed on!

Now that you have your capped pipe ready to go – it’s time to drill the spray holes!
When drilling the spray holes, the things to consider are Size and Number. We used a 1mm drill bit for our spray holes. You can make them smaller, but make sure the spray bar is fed reasonably clean water or you’ll be cleaning it constantly.
Since it can be hard to estimate how many holes you will need to match your water-in pressure, they easiest way to do it is with trial and error.
- Draw a line down the length of your pipe where you want your row of holes.
- Measure carefully, and mark across your line every 5cm (2in).
- Drill every third marked out hole.
- Test your spray bar.
- If it is too strong / high pressure, Drill every second marked out hole.
- Test your spray bar.
- If it is too strong / high pressure, Drill all marked out holes.
- If it’s still too strong, drill holes wildly, or drill with a larger drill bit, or consider powering it with less water pressure.
Install and maintenance
When installing your spray bar, try to use fittings that allow you to easily remove the bar for cleaning. We used a plastic U bracket in the center of our spray bars, and cut off one of the screw tabs on one side. We could then bend the U bracket and remove / replace the spray bar conveniently.
Sadly we don’t have any good pictures of our spray-bar fittings – this article will be updated next time we make one!
To clean your spray bar, you simply pop it out of it’s fitting, and unscrew the cap with the water-in plumbing. Fill your spray bar with water and give it a shake, or just blast it out with a garden hose. Screw the plumbed cap back on, and pop your clean spray bar back into place!
That’s it!
Leave a comment with any questions, ideas or recommendations. All comments will be read. This article will be updated more scientifically next time we make some spray bars – to include flow rates and pipe sizes etc.


1 thought on “Spray bars: designs & DIY”